Automated builds and code deployment (Part 5 - Putting it all together)
Read the other posts in this series:
Why Create an AX Build Server/Process?
Part 1 - Intro
Part 2 - Build
Part 3 - Flowback
Part 4 - Promotion
Part 5 - Putting it all together
Part 6 - Optimizations
Part 7 - Upgrades
In our implementation, we use TeamCity to manage each of the individual processes. I’ve discussed how the system not only makes it easier to migrate code through a development process, but also how to update the systems earlier in the cycle (like Dev) to reflect Production without any manual intervention. Both of these tasks benefit by having the entire process pre-scripted, allowing for the smallest amount of downtime so users and developers alike can get back to work as quickly as possible.
This post is now going to bring all the individual pieces together, to make a fully unified Lifecycle Management system. Linking all the processes together is where TeamCity really shines. With Build Triggers and Artifact Dependencies, we can automate the entire process so users don’t have to do anything - the system just does it.
First, let’s go over one new process I have not yet discussed: the data update.
Data Update
Some of our environments (most notably Staging) have a requirement to be updated to match production on a daily basis. The remaining environments do not have to be in a production state every day, but when they are updated they should reflect the closest state to production as possible. This requires the production database to be backed up nightly. To help with this, we created a new build configuration. We did not put it into one of the other configurations because it should be an independent process.
The data update configuration only has one step: Backing up the production database. This is a simple PowerShell script:
1 | $rootSourceLocation = "\\[Backup Network location]\" |
That’s all there is to it.
Now that we have all the processes defined, let’s examine how we want each of the pieces to execute. To help me visualize what should be happening when, I created this flowchart:
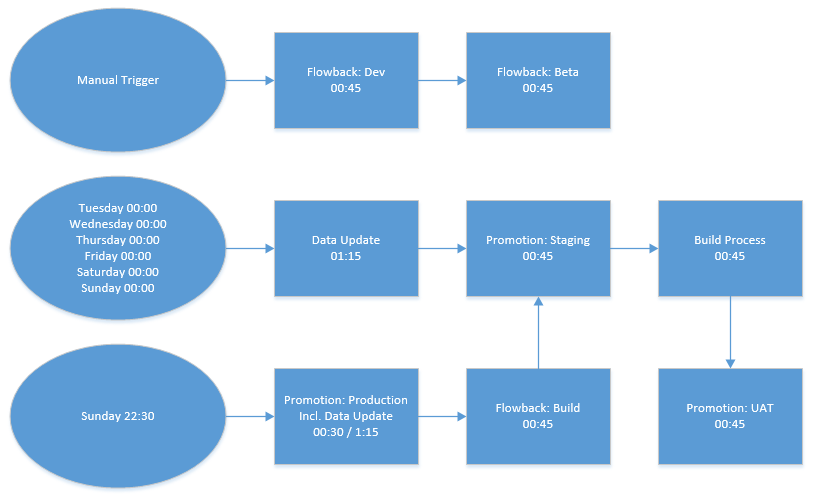
Each box represents one of the processes we have discussed previously. The round spots represent when each process line should begin. It should be noted that we also allow each individual task to be run manually. If anything is started manually, the next process in line will still fire. For example, if I trigger a Flowback: Dev manually, Flowback: Beta will automatically run when it has completed. Likewise, if I run a Promotion: Staging manually, it will be followed by a Build Process and Promotion: UAT.
The numbers in each box represent the total time to run the process (on average). This helps to determine the trigger times by working backwards from when we want the process to complete.
As you can see, we want there to be a data update, staging promotion, and build process every night, and we want a UAT Promotion to occur after every Build process (so we can begin testing the changes immediately). Dev and Beta are both manually triggered by developers, but when we update Dev we want to make sure Beta is updated with it so they have the same base code.
Now that we have an idea of how each of the individual tasks relate to each other, we can begin scheduling the tasks in TeamCity, using the triggers section of each build configuration:
| Process | Trigger Type | Description |
|---|---|---|
| Flowback: Dev | None | |
| Flowback: Beta | Finish Build Trigger | Wait for successful build in AX Lifecycle: AX Flowback: Dev |
| AX Data Update | Schedule Trigger | Cron command: 0 0 00 1,3-7 * (Server Time Zone) |
| Promotion: Staging | Finish Build Trigger | Wait for successful build in AX Lifecycle: AX Data Update |
| AX Build Process | Finish Build Trigger | Wait for successful build in AX Lifecycle: AX Promotion: Staging |
| Promotion: UAT | Finish Build Trigger | Wait for successful build in AX Lifecycle: AX Build Process |
| Promotion: Production | Schedule Trigger | Weekly on Sunday at 22:30 (Server Time Zone) |
| Flowback: Build | Finish Build Trigger | Wait for successful build in AX Lifecycle: AX Promotion: Production |
| Promotion: Staging | Finish Build Trigger | Wait for successful build in AX Lifecycle: AX Flowback: Build |
The Schedule Triggers mean the process starts at specific times. Because we want to execute the Data Update process 6 out of the 7 days per week, instead of creating one trigger for each day, we just use a simple Cron statement to execute on certain days (in this case, Tuesday through Sunday). It should also be noted that the Data Update starts running at midnight, compared to the Production Promotion, which starts at 11:30pm, so the Data Update schedule must be offset by one day or multiple processes with overlap each other.
The Finish Build Triggers wait for the particular event (in this case, a successful execution of the previous process), and then add themselves to the queue. If you have two processes with the same Finish Build Trigger, it’s more or less random which one will start first, but because our process is linear in nature, we don’t have to worry about that.
One of the nice side-effects about setting up triggers this way is they only run on successful completion. If for some reason the Promotion: Staging fails, nothing after it runs. Similarly, if a Build Process itself fails, UAT won’t be updated with the failed code. We still need to address the failure, of course, but by stopping the process line prematurely, no unnecessary work is done.
I should also note that the Production Promotion process includes a step that is identical to the data update. This is because after a production promotion, we want the Build server to update with the new code and data. However, we only want it to update after a production promotion. If we attempted to chain the Data Update after production promotion, and the build flowback after that, Build would be updated every night, which is not a good thing when we try to accumulate changes over the course of a week. This way, we can make sure Build is only updated once a week, and the data is still updated nightly.
Now that everything is scheduled, all that is left is for the actual developer work to finish. This process was established to help optimize the development process we have established internally:
- Request comes in, any missing information gathered by Project Manager
- Work assigned to developer by Project Manager
- Developer makes changes in Dev
- Developer loads changes in Beta, reviews with User for functionality testing
- User approves functionality testing
- Developer loads changes (with version control information) into Build
- Developer triggers Build Process. Build + Automatic push to UAT
- Project Manager reviews changes with user in UAT
- Project Manager accepts changes
- Approved changes pushed to Staging nightly
- Approved changes pushed to Production weekly
There are exceptions to some of these steps (for example, Beta and the associated user review is normally reserved for large projects with many working parts; in some cases, the user may not even be involved until UAT), but for the most part this is our workflow.
Some of the nice benefits we’ve enjoyed since implementing this include:
- Increased SOX compliance: the developer cycle (Dev -> Beta -> Build) is independent of the production cycle (Build -> UAT -> Staging -> Production).
- The code deployment processes are all well-defined and automated, so there is no risk “forgetting” to do a step, like copy version control information.
- All changes are traceable: If you have a production build number, you can see what the build process number is, and all the changes related to that build. There is also built-in auditing features that state who triggered a specific process, and when.
- If something goes wrong and you need to rollback to a previous version, it’s as easy as triggering a custom Production Promotion process.
I do hope the information in this series helps others to see the value in implementing a Lifecycle Management process for AX 2009, and gives some ideas on how it can be accomplished relatively quickly and painlessly.