Adventures in blogging
If you’ve visited my blog before, you may noticed things seem a little different. I’ve recently changed blogging engines, and I want to take a break from my normal AX writings to address it.
First, I want to address the reason why. The new engine is a static blog generator called Hexo. The reason I switched is not the usual reason people switch to a static blog: most people switch to increase performance on their site. While I’m not going to turn away any performance increases, that was not my motivation. I simply wanted to get away from using a database.
I’m sure if you are interested in learning more about static blogs and what benefits they may offer, there are plenty of write-ups elsewhere. However, there are few things (especially related to Hexo) that don’t seem to be covered anywhere I was able to find. I’ll get to that shortly, but first I want to cover some of the concepts about Hexo itself.
Standard Workflow
The normal workflow with Hexo is relatively simple:
- Create a new Markdown file with the post content and relevant metadata.
- Run
hexo generateto get the HTML files. - Deploy the recently generated files to the web host.
There are some additionally optional steps to help with the process.
Version Control
With a static generator, it’s often encouraged to have all the relevant information in Version Control. Hexo supports this by having a Node.js backend and taking advantage of Nuget Package Manager (NPM). Once everything is committed to a repository, it’s easy to get set up on another machine - just run npm install, which downloads all the necessary packages.
Deployment
Once you have the hexo packages, and you have your posts ready, you can run hexo deploy and have the generated files to a Git repository, or any other source you have identified in the hexo configuration. Alternatively, you can set up a second repository (linked to the output folder, Public), and after generation just commit and push that second repository. Note that the hexo deploy command requires Git.
Microsoft Azure
Microsoft Azure is an awesome utility for hosting websites. One of the nice features Azure boasts for websites is continuous deployment. You can hook up the website to a version control repository, and when a change is detected it is automatically deployed. The only thing to keep in mind is that this will deploy the root of the repository. I’ll go into more details on this further down.
I like having the Version Control to track the changes over time. Considering the settings available via the engine (which are also tracked in a text file), it also makes it easy to change the settings and review how things changed over time. However, I found the deployment to be a little lacking for my workflow.
Ideally, I would have a single repository that contains all the information relevant (the posts, the configuration, and resources like images), and when I commit a change to that repository, the necessary files are generated and deployed into the website.
Hexo isn’t completely conducive to this type of workflow, so some accommodations will need to be made. However, I have been able to come up with a solution that effectively has the workflow I want.
Getting the deployment to work with only a single repository is difficult. I can use Azure’s Continuous Deployment feature, but because it will deploy everything in the root of the repository, and hexo puts the generated files (to be deployed) into the /Public/ subfolder, this won’t work as intended.
In the end, I decided to again turn to TeamCity. I did attempt to use a couple other tools, such as Visual Studio Team Services, but I wasn’t able to get them work correctly. I have to use a second repository to contain all the published files, but I’ve been able to hide it behind TeamCity so I don’t have to deal with it. This ultimately allows some extra flexibility in my workflow by being able to decouple the generation of the content from the deployment, but at a cost of having more points of failure and greater setup complexity. Additionally, I was able to use Mercurial as my version control system, which I’m more familiar and comfortable with compared to Git.
Setup
Preliminary
To make sure everything would work the way I envisioned it, I had to do a little bit of setup to my TeamCity server. First, I had to install npm. Since Git has npm bundled with it, I opted to just install Git. This would also allow me to run Git command lines if necessary. Once npm was installed, I also installed the hexo-cli package globally, so I could run the necessary hexo commands.
Once that was finished, I created a second version control repository and cloned it to a folder on the server. I had to make sure the repository had a proper commit name and credentials in the /.hg/hgrc folder, since the TeamCity agent runs under a separate login on the server.
TeamCity Steps
The final build configuration is five steps: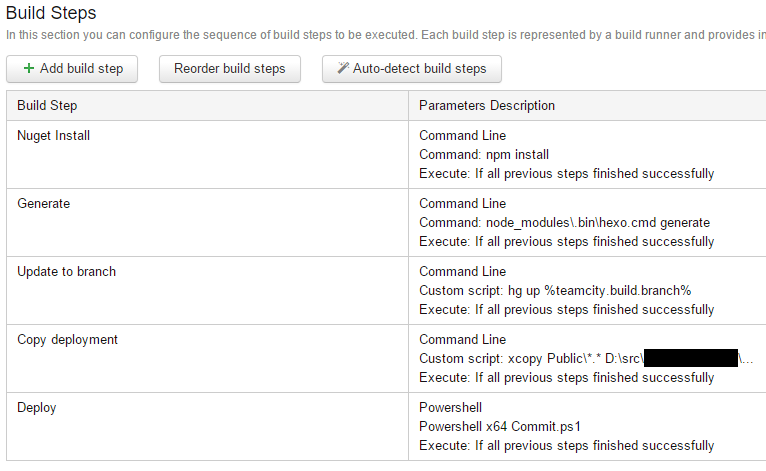
As you can see, most of the steps are simple command lines that are explicitly spelled out in the configuration itself. These could be extracted to files, but they’re very simple and not really going to change.
Step 1: NPM Install
The configuration is set to automatically clean the checkout directory prior to downloading the repository contents. This allows the safety of not accidentally publishing orphaned or corrupted files. Because this also clears the local npm packages, the first step is to reinstall them.
Step 2: Hexo Generate
With the npm packages in place, we run the hexo command (in this case, hexo is not part of the local PATH, so I manually point to it in the node_modules\.bin\ folder) to generate all the files to be deployed.
Step 3: Update Mercurial branch
Before I copy the generated files to the version control directory for deployment, I need to make sure I am in the correct branch. In my case, I have two branches: default and Test. When I make a commit to the master repository, I want to make sure the artifacts are committed to the same branch in the deployment repository. I can use the %teamcity.build.branch% variable to identify which branch of the master repository is currently being built.
Step 4: Copy deployment files
Now I need to transfer the generated files into the local repository I created earlier. A simple xcopy Public\*.* [destination] /s /y will copy all the files, overwriting where necessary, into the publish directory.
Step 5: Deploy
All that’s left is to commit and push the changes. Because I use the current branch in the commit message, I opted to extract the process to a PowerShell file which is stored in the master repository:
1 | [CmdletBinding()] |
This can be a Command Line and hard-coded directly in the build step, depending on what you need.
Step 6: Profit
Once the changes are pushed into the deployment repository, the TeamCity process is done, and other automated processes kick in. I have a couple Azure Websites set up which monitory for changes in a specific branch of the deployment repository. When it detects changes, the site is automatically updated, and the content is available for all to enjoy.
Finally, I wanted to touch on one thing that I consider a shortfall of static blogging that this system actually helps to address: future dating.
I normally have 2-3 posts in progress at any given time, which are generally scheduled to be published sometime in the future. When you have a database-backed engine, this is trivial to implement: when a request is made, simply check the publish timestamp with the current time, and either display or don’t display the content. Because a static content engine, by definition, is generated prior to the request being made, there’s no good way to future-date posts.
With this system in place, I can add a trigger that causes the content to be regenerated every day (or more often), and when new content is available have it automatically deployed to the site.
I hope this helps anyone who is interested in having a Hexo (or other static content) blog deployed automatically. I know there are other systems which have workflows that are more conducive for “magical” auto-deployment, but I also wanted to illustrate that they aren’t absolutely necessary.