Read the other posts in this series:
Why Create an AX Build Server/Process?
Part 1 - Intro
Part 2 - Build
Part 3 - Flowback
Part 4 - Promotion
Part 5 - Putting it all together
Part 6 - Optimizations
Part 7 - Upgrades

In this part of my Automated Build and Code Deployment series, I’ll be going over one of the more critical aspects: the build itself. I’ll outline exactly what happens during the build process, including code examples where necessary. The automation does require some changes to AX to help it run more efficiently.

To help orchestrate every step of the build process, we are using TeamCity, an easy to use continuous integration tool (http://www.jetbrains.com/teamcity/), and a series of short and simple powershell scripts. To help with the process, we keep all the scripts under VCS which is then linked to TeamCity. If any changes occur to the scripts, the changes are applied prior to running any tasks.

The TeamCity Agent responsible for running the tasks is installed on the build server, running under a dedicated user that has administrative rights. The user is also granted administrative rights in AX (Build only) so it can run the Sync and Compile commands.

To help, here’s an overview on how TeamCity can help to accomplish the goals as ideals I set in my previous post:

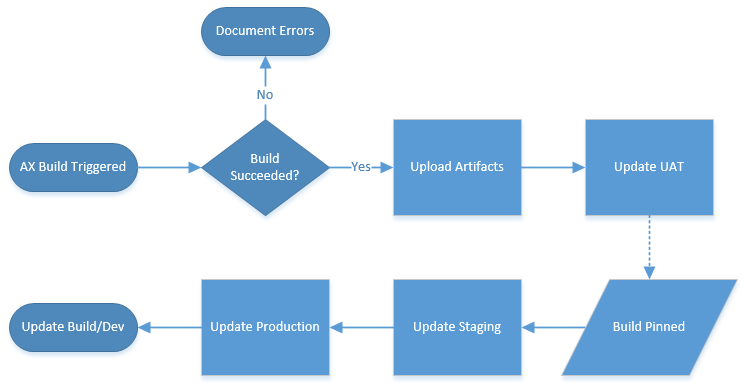
All the processes except for one are automated. In this case, the Build Trigger is a scheduled item, as is the update from Staging to Production and UAT to Staging. However, the artifacts used on UAT and Staging are different depending on the conditions of the build. UAT will use the artifacts from the last successful build (and will process as soon as the Build is completed), while staging will use the artifacts from the most recent pinned build. Because pinning a build is a manual process, and the ability can be restricted to certain users, it makes the ideal condition to determine the code that gets pushed to Staging. However, in TeamCity artifacts from pinned builds are kept indefinitely regardless of the cleanup plan you specify. We are planning on only keeping 3-4 builds pinned at any given time, so we can manage the space artifacts take up and still have enough history to rollback if necessary.

The actual AX build consists of 3 steps: Synchronize the Data Dictionary, compile the code, and figure out what happened. Our build process will address all three of these steps. If any additional requirements come up, TeamCity makes it easy to add new steps so we can make sure those happen as well. Because the scripts are wrapped in a VCS, it’s easy to make script modifications and to track when a change happened.

AX already has built-in command line commands to help handle the Data Dictionary synchronization and the system compile. Both commands will automatically close AX when the process is complete. In addition, the system compile command automatically takes the compiler output and saves it to a file, for later analysis. However, the normal output file is an HTML file with embedded XML output from the tmpCompilerOutput table, which holds all the information you normally see on the compiler. Because the HTML file does not render properly on modern browsers (it only works on Internet Explorer 9 and earlier, and even then does not do all it should if you examine the source), I have opted to change the SysCompilerOutput class so it outputs directly to a .xml file with only the pure XML. This also makes it easier to parse the results. If you want to do the same, here’s how:

SysCompilerOutput.classDeclaration
1
2
3
4
5
//Change
#define.compileAllFileName('\\AxCompileAll.html')

//To
#define.compileAllFileName('\\AxCompileAll.xml')
SysCompilerOutput.xmlExport
1
2
3
4
5
6
7
8
//Comment out or remove the following lines:

file.write(#htmlStart);
file.write(#compileXmlStart + '\n');
.
.
.
file.write(#htmlEnd);

If you would rather keep the HTML file and use it instead, you will need to make some changes to the script to account for the extra XML nodes. In addition, you will likely need to account for the XML header information (<?xml version="1.0" encoding="UTF-8"?>), as it may lead to parsing errors.

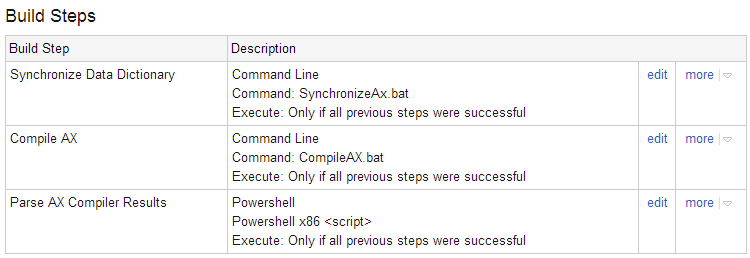
The actual build configuration in TeamCity is rather simple, only 3 steps:

SynchronizeAx.bat:

SynchronizeAx.bat
1
ax32.exe -startupcmd=synchronize

CompileAx.bat:

CompileAx.bat
1
ax32.exe -startupcmd=compileall_+

The Parse AX Compiler Results task is little stranger, but only because TeamCity currently has a bug that causes it not to use the correct return value from PowerShell scripts.

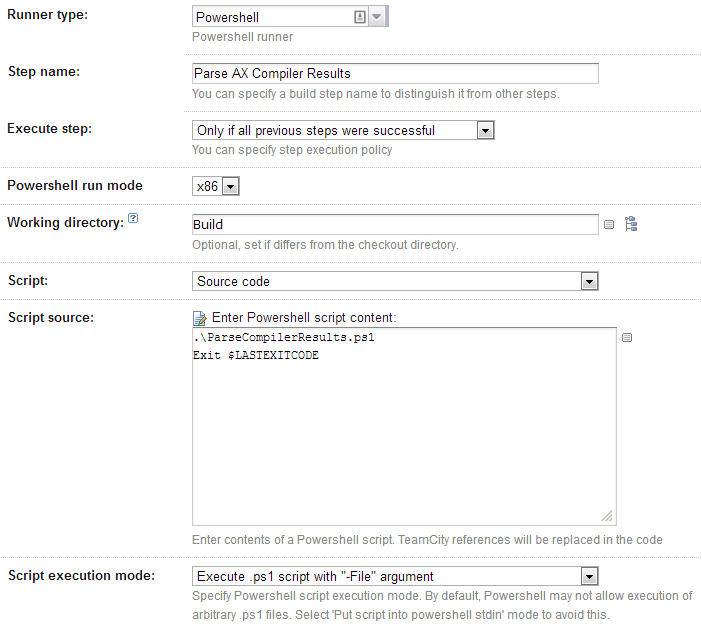
The script source allows the script to run, and returns the error code from that script if there is any.

ParseCompilerResults.ps1 looks like this:

ParseCompilerResults.ps1
1
2
3
4
5
6
7
8
9
10
11
12
13
14
15
16
17
18
19
20
21
22
23
24
25
26
27
28
29
30
31
32
33
34
35
36
37
38
39
40
41
42
43
44
45
46
47
48
49
50
51
52
53
54
trap
{
# On any thrown error, return with a non-zero exit code
exit 1
}

if ($env:TEAMCITY_VERSION) {
# When PowerShell is started through TeamCity's Command Runner, the standard
# output will be wrapped at column 80 (a default). This has a negative impact
# on service messages, as TeamCity quite naturally fails parsing a wrapped
# message. The solution is to set a new, much wider output width. It will
# only be set if TEAMCITY_VERSION exists, i.e., if started by TeamCity.
$host.UI.RawUI.BufferSize = New-Object System.Management.Automation.Host.Size(8192,50)
}

[xml]$xml = (Get-Content "C:\Users\Public\Microsoft\Dynamics Ax\Log\AxCompileAll.xml")

$ns = @{ Table = "urn:www.microsoft.com/Formats/Table" }

$errorNodes = Select-Xml -XPath "/AxaptaCompilerOutput/Table:Record[Table:Field[@name='SysCompilerSeverity'] = 0]" -Xml $xml -Namespace $ns
$warningNodes = Select-Xml -XPath "/AxaptaCompilerOutput/Table:Record[Table:Field[@name='SysCompilerSeverity'] > 0 and Table:Field[@name='SysCompilerSeverity'] < 255]" -Xml $xml -Namespace $ns
$todoNodes = Select-Xml -XPath "/AxaptaCompilerOutput/Table:Record[Table:Field[@name='SysCompilerSeverity'] = 255]" -Xml $xml -Namespace $ns

$success = $true

foreach ($node in $errorNodes)
{
$success = $false
$nodePath = ($node.Node.Field | ? { $_.name -eq "TreeNodePath" }).'#text'
$message = ($node.Node.Field | ? { $_.name -eq "SysCompileErrorMessage" }).'#text'

write-host "##teamcity[message text='${nodePath}: $message' status='ERROR']"
}

foreach ($node in $warningNodes)
{
$nodePath = ($node.Node.Field | ? { $_.name -eq "TreeNodePath" }).'#text'
$message = ($node.Node.Field | ? { $_.name -eq "SysCompileErrorMessage" }).'#text'

write-host "##teamcity[message text='${nodePath}: $message' status='WARNING']"
}

foreach ($node in $todoNodes)
{
$nodePath = ($node.Node.Field | ? { $_.name -eq "TreeNodePath" }).'#text'
$message = ($node.Node.Field | ? { $_.name -eq "SysCompileErrorMessage" }).'#text'

write-host "${nodePath}: $message"
}

if ($success -eq $false)
{
throw $_
}

The top of the script (before [xml]$xml = Get-Content…) sets a generic error handler to return a non-zero error-code when it fails, and sets the TeamCity Runner to a wider screen size. The screen size is necessary because otherwise there is a good change the ###teamcity messages will not be parsed correctly because they are too long. You can tweak the script as necessary (by adding $success = $false to any of the other foreach blocks) to raise your quality bar as you see fit.

It would also be wise to adjust the Build Failure conditions to include “an error message is logged by a build runner” and “build process exit code is not zero”. You can define additional failure conditions as desired.

Finally, we have artifact paths set as follows:

1
2
3
4
5
C:\Program Files\Microsoft Dynamics AX\50\Application\Appl\DynamicsAx1\*.ald => BuildFiles.zip
C:\Program Files\Microsoft Dynamics AX\50\Application\Appl\DynamicsAx1\*.add => BuildFiles.zip
C:\Program Files\Microsoft Dynamics AX\50\Application\Appl\DynamicsAx1\*.ahd => BuildFiles.zip
C:\Program Files\Microsoft Dynamics AX\50\Application\Appl\DynamicsAx1\*.aod => BuildFiles.zip
C:\Program Files\Microsoft Dynamics AX\50\Application\Appl\DynamicsAx1\*.khd => BuildFiles.zip

This allows all the data files to packed up into a single zip file, which is then uploaded to TeamCity for later use. Interestingly enough, even though these are binary files (except the label files, which are plaintext) we are still getting a 10% compression ratio, meaning our 3.5GB of files are compressed to 350MB.

That’s all there is to it! Once it’s set up, build will happen automatically. Combined with some tools that hook into TeamCity, like VisuWall, you can easily identify where any issues may be:

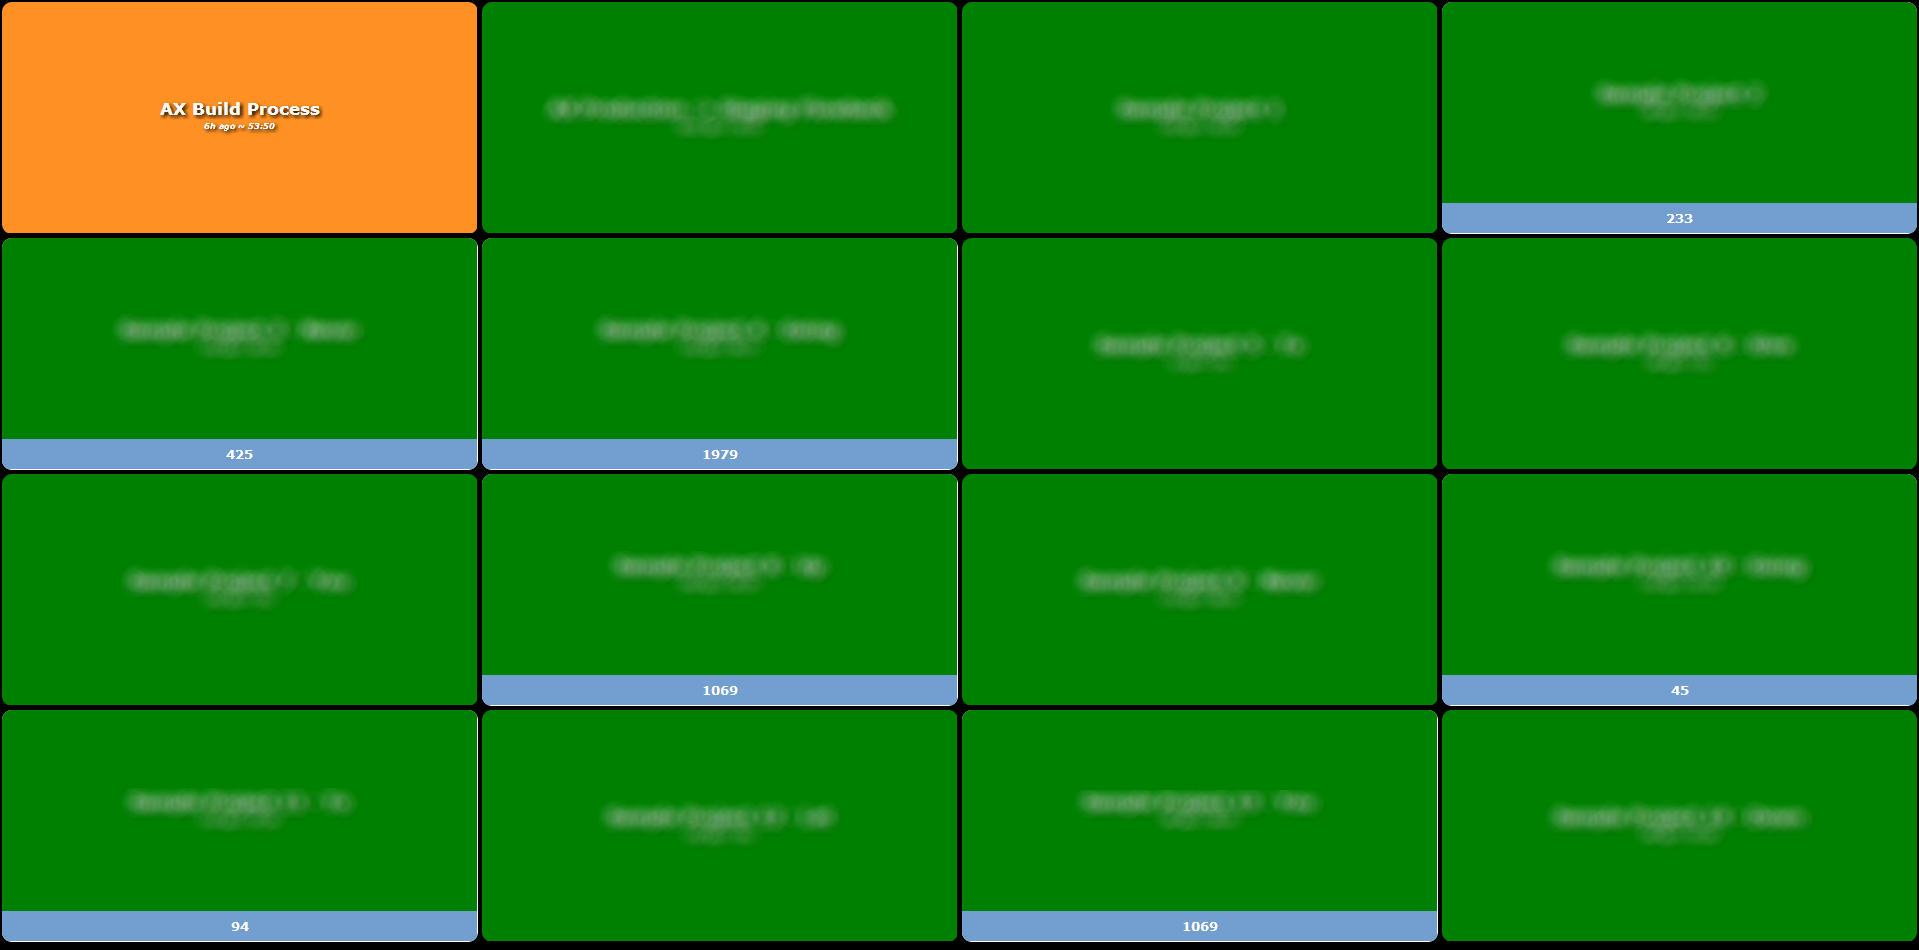
As you can see, the AX Build process is failing. The build log for the build contains the details of what failed. In our case, some classes contain a syntax error that need to be fixed. In our process, this would not trigger an update of UAT until it was fixed.

This screen is on display for everyone to see in our IT area, and updates in realtime. When we fix those classes, the block will turn green like the rest of the board. Plus, the AX process displays the same way the rest of our projects do, making it an easy way to know what’s happening in development.

Comment and share

Read the other posts in this series:
Why Create an AX Build Server/Process?
Part 1 - Intro
Part 2 - Build
Part 3 - Flowback
Part 4 - Promotion
Part 5 - Putting it all together
Part 6 - Optimizations
Part 7 - Upgrades

As I’ve mentioned a couple times, I am pushing to create a system within our AX implementation which will automatically deploy code changes through to our production environment. Some parts of this system (like to our Production server) will be automatically deployed, while others (like to the Staging server) will require a manual approval before deployment.

In this post, I plan on outlining exactly how I will approach this kind of system, some of the considerations and reasoning behind some of my ideas. I am only going to cover this from a relatively high level; in a future post, I will give some actual code examples on how to accomplish the tasks outlined here.

First, our overall layout would look something like this:

The first thing you can see is that the development is cyclical, which is best practice in any environment. Once the code is promoted to production, the development systems are updated to match, ensuring future development does not overwrite recent modifications. For the purposes of this post, we will not discuss the data flow.

As for the actual makeup of the system, I am using a total of 5 servers. More stringent requirements may insist on more (I’ve seen as many as 8), and you can do it with as few as 4 by eliminating the dedicated Build server and combining the functionality with the User Acceptance Testing, but it would require a little more management to ensure procedures happen in the correct order. A 5 server system eliminates many of those problems with minimal resource requirements.

I’ve also included how code is transferred between each of the environments.

XPO

Transfer files by exporting the raw XPO from the source system, and importing it into the destination system. IDs are generally not exported or imported. This method should only be used prior to the build taking place. A database sync and full compilation are necessary for all the changes to take effect.

Automatic Layers

The fully compiled set of layer and label files are moved automatically from the source system to the destination system. This can take place on a schedule or when triggered by a system event. Unless a temporary storage location is used, both environments must be taken offline. When the system is brought online, only a database sync is necessary.

Manual Layers

The fully compiled set of layer and label files are automatically moved from the source system to the destination system. The transfer only occurs on a specific, user-initiated event. Unless a temporary storage location is used, both environments must be taken offline. When the system is brought online, only a database sync is necessary.


As you can see, the entire system is not completely automated. At key points there is human interaction required. This can be something as simple as running a batch file, which triggers the code push to the next environment. However, depending on your programming skills and specific business requirements this can be any human-based event. In either case, the actual transfer of code (including XPOs) should be completely automated whenever possible.

Environments and Promotion

Since each step along the development process has its own considerations, I’ll approach each stage and how code in that stage is pushed to the next.

Development → Build

This is probably the most critical step in the entire process, and the one that incurs the most risk. Transfers from Development to Build should happen via XPO files, ideally a project containing all the necessary elements. This allows projects to be pushed through separately, even if the development is happening concurrently. Some care needs to be taken if separate projects touch the same elements. Since the transfers occur in a plaintext format, it is possible for changes to the code to be made, if you know what you’re doing. Ideally the XPOs would be loaded into the Build server during the day as they complete. It is possible to create an automated XPO import system to handle this. The developer would export the XPOs to a specific folder (like a network share), which the Build server would process out of. However, the automated portion of this can easily be replaced with a non-developer, who would periodically import the XPOs in manually. If no such control is necessary, the developer can import into Build directly.

Build → User Acceptance Testing

I am assuming a nightly build. During the build process, the Data Dictionary is synced and the AOT is fully compiled. Any errors are thrown into a log file on the server, and examined. If errors occurred during the build, it is considered failed. It is important to note that “errors” should refer to your desired build quality. The log should report on all critical build errors (missing references, undeclared variables, unterminated statements), warnings (not calling an expected super(), not returning a value, precision loss), and best practice deviations. If it up to your organization to determine what is considered acceptable in a build.

A successful build will trigger an immediate shutdown of the build server, and the Layer and Label files sent to the User Acceptance Testing environment. The recommendation is to move the files to a temporary storage location, so the Build server can be brought online again right away. The Test environment would then shut down and copy those files, overwriting the existing set. The Test update would happen on a schedule off-hours, so not as to disturb any testing that might be done during the day. Once the server it brought back online, a Data Dictionary sync (plus restart of any services like IIS) is all that remains.

User Acceptance Testing → Staging

User Acceptance is probably the most important but longest running part of the development process. As the name implies, this is where the code undergoes testing by the user (preferably the one who originally made the request, but this can vary depending on the nature of the request). Only when the user has given their approval should the code be promoted into the Staging environment. If you have multiple projects in development concurrently with different approvers, there are a few issues that should be addressed. Since the goal is to move all the code through as layer files, and there is no way of separating specific elements from those files, it can be a pain when approval for one project come in before others, or when a project needs to be streamlined through the process ahead of other projects that have been in development longer. One thing to keep in mind is that all elements in the User Acceptance environment should be accepted or declined as one. If a single element fails testing, the entire environment should fail. Ideally, only a single project should be pushed through User Acceptance at a time. Since this would generally be a rare occurrence, it would be recommended that when it comes time to push accepted projects to staging, the entire environment is re-built without the unapproved projects, and when completed the User Acceptance environment is promoted to Staging.

Because the amount of time it would take to get approval will vary, the push to Staging should not be set on a schedule.

Staging → Production

The Staging environment is considered the gateway to production. Because oftentimes the downtime available to an AX administrator is limited, it is imperative to take advantage of any downtime that is available. The Staging environment allows code deployments to be scheduled during downtime without any Administrative interactions. Since we have pre-compiled all the code to be deployed, we are eliminating the time needed for Production to compile the incoming code. Since all the errors should have been addressed during the Build process, we do not need to have a person present for the promotion. All that is necessary is a Data Dictionary sync and a restart of any AX-dependent services.

Other Notes

To preserve previous updates, once Staging has been deployed to Production, the Build server should be automatically updated to match Production. This means any projects not yet approved would need to be re-imported every development cycle. To prevent too many conflicts, the Development environment should also be updated to match Production. However, this can be a manually triggered process (ideally by the devs themselves) to make sure any active development projects aren’t lost. Both of these updates are identified by the dotted lines.

To keep the continuity with multiple projects in development, the Build server should ONLY be updated immediately after Staging is deployed to Production, and all still-in-process projects should be re-imported to the Build server as soon as possible. If you do automate the XPO transfer to the Build environment, this becomes much easier to handle.


I hope that this post can help you to automate code production within your own AX environment. I know there are a lot of points left out, but I do hope to address those points in future posts. If you have any questions regarding any point, please let me know below.

Comment and share

Read the other posts in this series:
Why Create an AX Build Server/Process?
Part 1 - Intro
Part 2 - Build
Part 3 - Flowback
Part 4 - Promotion
Part 5 - Putting it all together
Part 6 - Optimizations
Part 7 - Upgrades

This post is a precursor to another post I’m working on, but the information in it is too unique and involved to just add to that post. Instead, I’m putting this in its own post so it’s easier to reference.

In short, this is to answer one question I have, until recently, been struggling with: Why should an AX development and the deployment process consist of a build server?

Unlike most programming structures, the use of a build server or build process is not as intuitive for AX. However, after attending Summit this year, I’m beginning to understand that while it may not reach it’s full potential when there is a small development team, it becomes incredibly helpful for larger teams. This doesn’t mean you shouldn’t use one in a small team, but with one or two developers it creates more overhead than it would for a large team.

A lot of the considerations revolve around standard development practices, and what the community has established as Best Practices. If you already have a development infrastructure in place (separate development, test, and pre-production environments), this can also be very easy to implement.

Originally, our primary way of transferring code between all environments was done via XPO files. There were some issues with this, mostly streaming from having multiple AOS instances, but we were able to overcome that by scheduling our code updates to work with an AOS restart schedule. Since we are publically traded, this also helped separate those that develop (me) from those who administer the production environment (my boss).

Over the course of time, I began to learn some of the Best Practices used in an AX development environment - multiple environments dedicated to specific functions (Dev, UAT, pre-production), as well as effective code management using the binary .aod files.

However, everything really came together at Summit, when I learned that as Best Practice you should do a full system compilation on the destination system. That is, unless you move ALL the layer files from a system that has already been through a full compile. As long as no further code changes are made, you can use those files through the entire deployment process, meaning (assuming you follow Best Practice) you save time on every step of the process.

Comment and share

AX Summit 2013

So, I’m in Tampa at the 2013 AXUG Summit. Even after just the first day I’ve gotten a lot of good information about how to set up a couple of things I’ve had my eye on with regards to our deployment and even had a few ideas on new posts.

I’ve also met several truly awesome people who have some incredible tales for what to do and what not to do. And the biggest surprise is that I am giving others advice based on my own experience – something that given how long I (haven’t) been doing this for encourages me.

Once I get back I’m sure I’ll be summarizing my experiences and expanding with more details. Meanwhile, talking with others who are in the same situation as I am for certain things gives me ideas on how I can make the AX community a better place. To that end, I have decided that I will eventually publish the security tools I have written (both for an administrator and as an auditor contact). Before I do so I will need to clean them up and make sure everything is in order, including the accompanying X++ code. Since it was originally written just for my own internal purposes, it’s not as good as it could be. I’ll be working on that in my “free time”, and hopefully will have something publishable by the end of the year.

In addition, sitting in a session about code deployment and maintenance has me inspired to implement an automated code deployment system which follows best practices such as deployment of layer files and version control (in this case using MorphX VC). I know where I want to go with this, but I’m not entirely sure how to go about the actual implementation. I will also be working on this in my “free time”, but we’ll see when I finally get a nice polished system in place. In the meantime, I’ll likely post an occasional update when I find something new or interesting.

Comment and share

We have recently seen an issue with the Export to Excel feature of AX 2009, where a stray double quotation mark in the grid will cause all subsequent fields to be offset. Instead of getting nicely formatted rows and columns, we had a few well-formatted rows, and some other rows that weren’t so nicely formatted. This is also shown in one or two other places around there internet (such as http://community.dynamics.com/ax/f/33/t/102643.aspx), but as much as I looked I could not find a solution. We had looked at this problem earlier, as many of our part number include double quotes to represent inches. Previously, we modified the itemName method on the InventTable to replace double quotes with single quotes, as that would not break Excel and was an easy fix. However, we recently discovered that many other user fields were starting to have double quotes in them, and we needed a way to address all of them.

Taking a lead from the MSDN post How does the Export to Excel feature work under the hood, I looked at the SysGridExportToExcel class, specifically the performPushAndFormatting method. I also began to monitor the Windows clipboard, since as that posts explains, the Export to Excel feature relies heavily on the clipboard.

I figured there are three ways I can attack this issue:

  • Create an edit method for every field that would hold a double quotation mark, and reference that method instead of directly referencing the field on the form. This would cause the form filter to not work properly, plus the thought of doing this for every field seemed daunting.
  • Modify the system so that when the Export to Excel process begins (before the clipboard is populated) all the incoming fields have their double quotes replaced to two single quotes. This is the ideal solution, since there would not be any reprocessing costs like there would be later in the process (after the clipboard has been populated)
  • Modify the system so that after the clipboard is populated but before the information is pasted into Excel, all double quotes are replaced to single quotes. Looking at the information that was being sent to the clipboard showed that the information was formatted as Tab separated values, with most test field surrounded by double quotes, which would need to be preserved.

Since the first option would be a last resort, I began to look into the second option: modify the system to change how it generates the information to be sent to the clipboard. However, even searching online I could not find where the system did this. The only clue I had was the stack trace after hitting a breakpoint early in the performPushAndFormatting method, which seems to indicate it was built into the FormRun base class. Because it is a system base class, I cannot modify it (though it would be the appropriate place to do so). My only other option would be to create my own class that inherits from FormRun, override the Task to build in my own functionality, and proceed to update every form in the system to inherit from this new class. However, since I have no idea what is actually happening in this method AND I would have to do it on every form, this also seemed like a dead end.

The last option, to modify the clipboard data after it has already been generated seemed to be my only option. I discovered the TextBuffer class in AX has a handy fromClipboard and toClipboard method, so I would use that.

Within the performPushAndFormatting method, before any of the Excel work begins, I added the following code:

SysGridExportToExcel.performPushAndFormatting
1
2
3
4
5
6
7
8
9
10
11
12
13
14
TextBuffer buffer = new TextBuffer();
System.Text.RegularExpressions.Regex regex;
str cleanedText;
;

if (buffer.fromClipboard())
{
regex = new System.Text.RegularExpressions.Regex("(?<=[^\\t\\r\\n])\"(?=[^\\t\\r\\n])");

cleanedText = regex.Replace(buffer.getText(), "\"\"");

buffer.setText(cleanedText);
buffer.toClipboard();
}

This replaces all double quotes that are inside the field with two double quotes, which Excel interprets as an escaped double quote. String type fields, when copied from the clipboard, are surrounded by double quotes; the regular expression above excludes those and replaces everything else.

We attempted several ways of accomplishing this goal, from using a series of strReplace commands, to manually parsing the clipboard string character by character, but both of these options were slow when dealing with a large export set.

Comment and share

  • page 1 of 1

James McCollum

author.bio


author.job