We have recently been able to really dive in to the AX AIF Webservices, and like most things the road was bumpy and filled with potholes. This isn’t to say that webservices had a lot of problems. In fact, using webservices was certainly beneficial since much of the work has already been done. However, there were some things we had to do to make sure evrything was working the way we want it to.
One of the biggest things that we ran into was making system fields, such as modifiedDateTime, modifiedBy, createdDateTime and createdBy, available for consumption by subscribers of the webservice. These fields, while available for use within AX and thus also available via the Business Connector, are not natively generated and added to the webservice classes.
In our case, we wanted to make sure we had the createdDateTime field available in the InvoiceService. The examples I will use will focus around this use case, but they should be transferable to any other similar case.
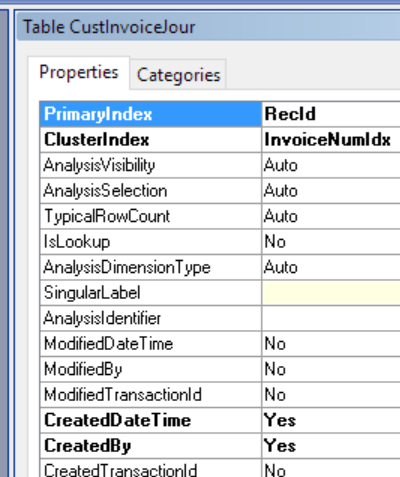
First, we need to make sure the table actually has the field enabled. On the table properties, simply make sure the createdDateTime property is set to “Yes”:
If this property is not set, change it and syncronize the table. You may also want to run the AIF “Update Document Service” process, but that is not strictly mandatory.
From there, we need to modify the appropriate AIF class to be able to read from the field. The class name we are looking for is named Ax[TableName]; since we are focusing on the CustInvoiceJour table, the class will be AxCustInvoiceJour.
Within this class, we will need to create a method that matches the format parm[FieldName]. Again, as we are trying to bring the createdDateTime field forward, the method will be parmCreatedDateTime. The method should be similar to other parm-type methods:
1
2
3
4
5
6
public [DataType] parm[FieldName]([DataType] _[FieldName] = [DataTypeDefault])
{
    [Value] = _[FieldName];

    return [Value];
}
In out case, this is our new method:
1
2
3
4
public UtcDateTime parmCreatedDateTime(UtcDateTime _createdDateTime = DateTimeUtil::minValue())
{
    return custInvoiceJour.createdDateTime;
}
You will notice that we left the assignment line of the normal method off our implementation. This is because the system fields are always readonly. This change allows someone to specify a new createdDateTime, but since the parameter is ignored, nothing will actually happen.
Finally, the last step is to “publish” the changes. This is done by opening the AIF Services form (found at Basic / Setup / Application Integration Framework / Services) and click the ‘Refresh’ button and then click the ‘Generate’ button. This will regenerate the WDSL files for the service, which can then be updated wherever the service is used.
I posted a while ago about how we modified the Export to Excel function to clean up some of our data on export, so Excel interprets it correctly. The problem addressed in that post is the fact that AX does not properly escape data (particularly double quotes) prior to sending it to Excel.
The solution in question basically intercepts the dataset generated by AX prior to sending it to Excel, runs it through a regex that replaces problem characters (in this case, double quotes) with a properly-escaped version (two double quotes). and then proceed to send the now-escaped data to Excel as usual.
This system works fine except for one situation: exceptionally large data sets take an enormous amount of memory to process, and tend to throw an OutOfMemoryException. In our situation, we tend to run into this with exports of unfiltered Item Details and broadly-filtered Production Orders. Since we need this data more often than one would think (especially the Item Details), we end up going into one of our updated test environments, disable the modification, and export the data from there. This is obviously cumbersome not only for our users, but also for our administrators who need to do the actual export.
Additionally, the modification did not address any other issues that tend to appear when dealing with Excel from AX (Note these issues aren’t directly tied to the Export to Excel function). In particular, we have come across some examples where newline characters and tab stops are added into various non-memo text boxes, like the Item Number and Item Description fields. If a report is ran which is then opened with Excel, these tab stops and newlines are preserved, throwing off the alignment of reports (in one case, we found an item description with 80 newline characters in front of it, pushing down the entire report 80 lines before any more data was displayed). Because these characters are non-printing, nobody notices them until reports that contain them are ran and someone notices the gaps. Even once they’re identified, most users do not know how to fix them because they are non-printing characters.
So, to help combat these issues, we decided to implement a system that would sanitize input as it is being entered. Because each value would be checked as it was entered, we no longer need to worry about the massive memory requirements. The system automatically removes the characters or changes them to more noticeable characters, like spaces, depending on where in the string they fall. We’ve also created it to be applied at a full table level, making it easy to apply to the places that need the most help, and being effective without any changes if a new field is added. Because some fields should be allowed to have these characters, we also added a way to exclude specific fields from being processed without compromising the functionality on the rest of the table.
while (listEnum.moveNext()) { seekStr = conpeek(listEnum.current(), 1); inRepStr = conpeek(listEnum.current(), 3); if (strFind(retVal, seekStr, 1, strLen(retVal)) > 0) { retVal = this.beginTrim(retVal, listEnum.current()); //Trim (remove) the current character from the beginning of the string retVal = this.endTrim (retVal, listEnum.current()); //Trim (remove) the current character from the end of the string retVal = strReplace(retVal, seekStr, inRepStr); //Replace any other occurences of the string } }
a = substr(input, strlen(input) - len, len); b = strRep(seekStr, len / inc);
while (substr(input, strlen(input) - len + 1, len) == strRep(seekStr, len / inc)) { len += inc; } len -= inc; return strfmt("%1%2", substr(input, 1, strlen(input) - len), strRep(repStr, len / inc)); }
protected List excludedCharacters(tableId _tableId) { DictTable dictTable = new DictTable(_tableId); List excludedCharacters; ;
if (tableHasStaticMethod(dictTable, identifierStr("SanitizeCharacters"))) { excludedCharacters = dictTable.callStatic("SanitizeCharacters"); return excludedCharacters; }
excludedCharacters = new List(Types::Container);
//Container mappings are as follows: //[0] = Character(s) to replace //[1] = Replacement value if character(s) are found at the beginning or end of the string //[2] = Replacement value if character(s) are not at the beginning or end of the string excludedCharacters.addEnd(["\r\n", "" , " " ]); excludedCharacters.addEnd(["\n\r", "" , " " ]); excludedCharacters.addEnd(["\n" , "" , " " ]); excludedCharacters.addEnd(["\r" , "" , " " ]); excludedCharacters.addEnd(["\t" , "" , " " ]); excludedCharacters.addEnd(["\"" , "\"", "''"]);
return excludedCharacters; }
boolean isExcludedField(tableId _tableId, fieldId _fieldId) { DictTable dictTable = new DictTable(_tableId); Set excludedFields; ;
if (!tableHasStaticMethod(dictTable, identifierStr("ExcludeSanitizeFields"))) returnfalse; excludedFields = dictTable.callStatic("ExcludeSanitizeFields");
if (excludedFields.in(_fieldId)) { returntrue; }
returnfalse; }
The main entry point is the static method sanitize, which takes a table record and a field number, and gives back a table record. The function will only clean one field at a time, because that is how the function we modify on the table side will also behave. Defined within the class are a list of excluded characters, which can be found in the excludedCharacters method. The characters can be overridden by adding a static SanitizeCharacters method directly on the table. Additionally, you can exclude specific table fields by adding a static ExcludeSanitizeFields method on the table. Note if you specify a SanitizeCharacters method, it will completely overwrite the defaults (newline/linefeed, linefeed/newline, newline, linefeed, tab and quotation mark).
1
2
3
4
5
6
7
8
9
10
publicstatic Set ExcludeSanitizeFields() { Set tempSet = new Set(Types::Integer); ; tempSet.add(fieldNum(InventTable, ItemNotes)); tempSet.add(fieldNum(InventTable, SpecificProductionNotes)); return tempSet; }
//Container mappings are as follows: //[0] = Character(s) to replace //[1] = Replacement value if character(s) are found at the beginning or end of the string //[2] = Replacement value if character(s) are not at the beginning or end of the string excludedCharacters.addEnd(["\r\n", "" , " " ]); excludedCharacters.addEnd(["\n\r", "" , " " ]); excludedCharacters.addEnd(["\n" , "" , " " ]); excludedCharacters.addEnd(["\r" , "" , " " ]);
return excludedCharacters; }
The excluded character list is actually a list of containers, each with 3 elements: the character(s) to look for, the character(s) to replace the first value with if they are found at the beginning or end of the string, and the character(s) to replace the first value with if they are found anywhere else in the string. This was because we wanted to define different behavior depending on where the strings were found - in some cases, we wanted to just remove them, and in others we wanted to replace them with spaces. The excluded fields are a list of integers, representing the field numbers for that table.
Finally, here is how we link this functionality into our table. Our code is triggered from the modifiedField method of the table:
this = SysInputSanitation::sanitize(this, _fieldId);
switch (fieldExt2Id(_fieldId)) { . . . } }
Because we set up the main entry point as a static method, we do not need to worry about instantiating the class etc. This does cause some overhead, as the class will instantiate itself for each request (that is, for every modified field), but we can reasonably rely on the Garbage Collector to help keep that in check. The table record effectively passes through the class, coming out scrubbed on the other end. From there, we can proceed to other field-specific changes outlined in the switch statement, treating the scrubbed data as if that is what the user entered.
The change the values are virtually invisible to the user, especially as far as the non-printing characters are concerned.
I need to point out the reason we include "\r\n" as a separate entry from "\r" and "\n" in the excluded characters list. Normally, these two characters do come in pairs. If we left the list to just read "\r" and "\n" individually, only one of the pair on each end of the string would be trimmed, while the rest would be treated as inside the string and replaced with a different character. For example, running the value "\r\n\r\n\r\n\r\nValue\r\n\r\n\r\n\r\n" would result in the value of " Value " (with 7 spaces on each side), instead of "Value" (with no spaces) as we would expect.
Finally, now that future inputs are cleaned up, all that is left is cleaning up historical data. You can easily wrap this into a one-time job that would clean some (or all) fields in a table, depending on how you write it. Once that is completed, the original modification can be backed out and the original functionality of the Export to Excel can be restored.
If you’ve visited my blog before, you may noticed things seem a little different. I’ve recently changed blogging engines, and I want to take a break from my normal AX writings to address it.
First, I want to address the reason why. The new engine is a static blog generator called Hexo. The reason I switched is not the usual reason people switch to a static blog: most people switch to increase performance on their site. While I’m not going to turn away any performance increases, that was not my motivation. I simply wanted to get away from using a database.
I’m sure if you are interested in learning more about static blogs and what benefits they may offer, there are plenty of write-ups elsewhere. However, there are few things (especially related to Hexo) that don’t seem to be covered anywhere I was able to find. I’ll get to that shortly, but first I want to cover some of the concepts about Hexo itself.
Standard Workflow
The normal workflow with Hexo is relatively simple:
Create a new Markdown file with the post content and relevant metadata.
Run hexo generate to get the HTML files.
Deploy the recently generated files to the web host.
There are some additionally optional steps to help with the process.
Version Control
With a static generator, it’s often encouraged to have all the relevant information in Version Control. Hexo supports this by having a Node.js backend and taking advantage of Nuget Package Manager (NPM). Once everything is committed to a repository, it’s easy to get set up on another machine - just run npm install, which downloads all the necessary packages.
Deployment
Once you have the hexo packages, and you have your posts ready, you can run hexo deploy and have the generated files to a Git repository, or any other source you have identified in the hexo configuration. Alternatively, you can set up a second repository (linked to the output folder, Public), and after generation just commit and push that second repository. Note that the hexo deploy command requires Git.
Microsoft Azure
Microsoft Azure is an awesome utility for hosting websites. One of the nice features Azure boasts for websites is continuous deployment. You can hook up the website to a version control repository, and when a change is detected it is automatically deployed. The only thing to keep in mind is that this will deploy the root of the repository. I’ll go into more details on this further down.
I like having the Version Control to track the changes over time. Considering the settings available via the engine (which are also tracked in a text file), it also makes it easy to change the settings and review how things changed over time. However, I found the deployment to be a little lacking for my workflow.
Ideally, I would have a single repository that contains all the information relevant (the posts, the configuration, and resources like images), and when I commit a change to that repository, the necessary files are generated and deployed into the website.
Hexo isn’t completely conducive to this type of workflow, so some accommodations will need to be made. However, I have been able to come up with a solution that effectively has the workflow I want.
Getting the deployment to work with only a single repository is difficult. I can use Azure’s Continuous Deployment feature, but because it will deploy everything in the root of the repository, and hexo puts the generated files (to be deployed) into the /Public/ subfolder, this won’t work as intended.
In the end, I decided to again turn to TeamCity. I did attempt to use a couple other tools, such as Visual Studio Team Services, but I wasn’t able to get them work correctly. I have to use a second repository to contain all the published files, but I’ve been able to hide it behind TeamCity so I don’t have to deal with it. This ultimately allows some extra flexibility in my workflow by being able to decouple the generation of the content from the deployment, but at a cost of having more points of failure and greater setup complexity. Additionally, I was able to use Mercurial as my version control system, which I’m more familiar and comfortable with compared to Git.
Setup
Preliminary
To make sure everything would work the way I envisioned it, I had to do a little bit of setup to my TeamCity server. First, I had to install npm. Since Git has npm bundled with it, I opted to just install Git. This would also allow me to run Git command lines if necessary. Once npm was installed, I also installed the hexo-cli package globally, so I could run the necessary hexo commands.
Once that was finished, I created a second version control repository and cloned it to a folder on the server. I had to make sure the repository had a proper commit name and credentials in the /.hg/hgrc folder, since the TeamCity agent runs under a separate login on the server.
TeamCity Steps
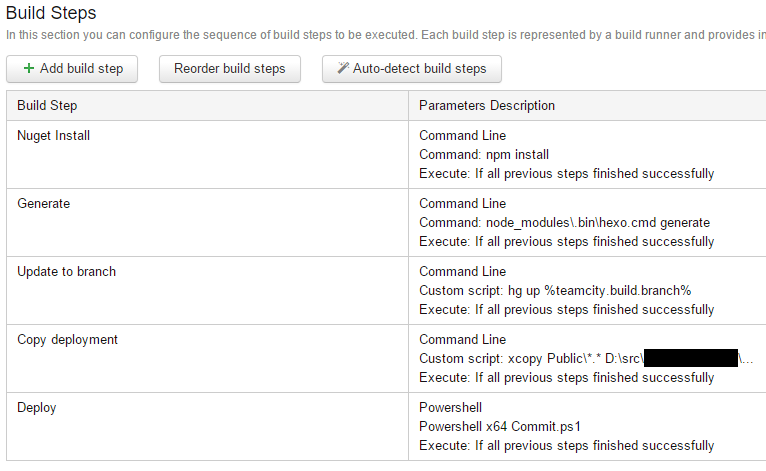
The final build configuration is five steps:
As you can see, most of the steps are simple command lines that are explicitly spelled out in the configuration itself. These could be extracted to files, but they’re very simple and not really going to change.
Step 1: NPM Install
The configuration is set to automatically clean the checkout directory prior to downloading the repository contents. This allows the safety of not accidentally publishing orphaned or corrupted files. Because this also clears the local npm packages, the first step is to reinstall them.
Step 2: Hexo Generate
With the npm packages in place, we run the hexo command (in this case, hexo is not part of the local PATH, so I manually point to it in the node_modules\.bin\ folder) to generate all the files to be deployed.
Step 3: Update Mercurial branch
Before I copy the generated files to the version control directory for deployment, I need to make sure I am in the correct branch. In my case, I have two branches: default and Test. When I make a commit to the master repository, I want to make sure the artifacts are committed to the same branch in the deployment repository. I can use the %teamcity.build.branch% variable to identify which branch of the master repository is currently being built.
Step 4: Copy deployment files
Now I need to transfer the generated files into the local repository I created earlier. A simple xcopy Public\*.* [destination] /s /y will copy all the files, overwriting where necessary, into the publish directory.
Step 5: Deploy
All that’s left is to commit and push the changes. Because I use the current branch in the commit message, I opted to extract the process to a PowerShell file which is stored in the master repository:
This can be a Command Line and hard-coded directly in the build step, depending on what you need.
Step 6: Profit
Once the changes are pushed into the deployment repository, the TeamCity process is done, and other automated processes kick in. I have a couple Azure Websites set up which monitory for changes in a specific branch of the deployment repository. When it detects changes, the site is automatically updated, and the content is available for all to enjoy.
Finally, I wanted to touch on one thing that I consider a shortfall of static blogging that this system actually helps to address: future dating.
I normally have 2-3 posts in progress at any given time, which are generally scheduled to be published sometime in the future. When you have a database-backed engine, this is trivial to implement: when a request is made, simply check the publish timestamp with the current time, and either display or don’t display the content. Because a static content engine, by definition, is generated prior to the request being made, there’s no good way to future-date posts.
With this system in place, I can add a trigger that causes the content to be regenerated every day (or more often), and when new content is available have it automatically deployed to the site.
I hope this helps anyone who is interested in having a Hexo (or other static content) blog deployed automatically. I know there are other systems which have workflows that are more conducive for “magical” auto-deployment, but I also wanted to illustrate that they aren’t absolutely necessary.
Upgrades are a natural part of life when dealing with software, and AX is no exception. If you’re still running AX 2009, the upgrades may have tapered off in favor of AX 2012 or even AX 7, but there are still patches released on a reasonable basis. If you have an automated code deployment system in place, however, these upgrades may be more complicated.
The way Microsoft distributes their updates is via an executable which deploys changes not only to the application files (normally the SYP layer), but in some cases to the actual server or application executable itself. Since our automated code deployment deals with the application files, the SYP changes will be propagated as normal, but we still need to manage the application executables. There is some added difficulty in that both the application executables and application files should be deployed around the same time to avoid either being out of sync.
We recently decided to upgrade our system from 2009 RU6 to RU8. The patch itself wasn’t to really fix issues we had, but to ensure we were compatible with some 3rd party software we were looking at. Prior to the deployment, we deployed RU8 to a test environment and performed functionality testing so we knew what we were getting into.
When it came time to deploy, we ensure that it would be the only thing that was applied to our Build system (we put a hold on development for a couple weeks). Since the patch would still have to go through our normal gauntlet of environments before reaching production, this allowed us to roll back in case we found a stopping issue.
Prior to the automated deployment to each environment, we applied the RU8 patch to the environment. The automation then would overwrite the changed layer files with those from Build (which should be the same), and everything would be in sync post-deployment. Because we wanted the timing to be reasonably close, our team had to work closely to ensure everything was on track. To ensure nobody used the environment before the deployment had a chance to run, we unchecked the option to restart the application server when the upgrade was complete. The automated process would then turn it back on as part of its normal operation.
Finally, when it came time to upgrading the production cluster, we came in after-hours before the normal scheduled update and did the same as we did to the pre-production environments: leaving them offline after the patch, and letting the automated deployment turn them back on. We did have to schedule downtime because of the extended time needed to apply the patch, but our users were well-informed and we didn’t have any issues.
In short, the automated build process can still help deploy any patches you need to apply to AX, but care must be taken to ensure the application executables are upgraded at the same time as the application files, or else you risk errors in the environment.