Some time ago, my organization had the need to have a new company established in AX. The direction given to us was that this company was to have their own sets of books for tax and reporting purposes, but manufacturing would continue to be done within our primary company, which was facilitated by the AX Intercompany functionality.

More recently, the directive came that this other company should no longer exist - there actually isn’t any need to have the financials separated from the primary organization, and the intercompany transactions are adding too significant an overhead to our processes to justify its continuation.

This put us in an interesting position: we now need to merge the data from one company into another company so users will only need to operate in one.

 
We explored several options to move data from one side to another. The biggest benefit was that, because both companies are in AX 2009, we have the same database backend, and a majority of the settings are identical. During this exploration, we looked at several possible solutions: using the AX Data Import/Export tool, using Atlas, duplicating the records in SQL directly and updating the DataAreaId, and others. No solution seemed to have an ideal migration path: while some settings like parameters were the same between the companies, others like item groups and financial dimensions had diverged and did not have matching codes on both sides.

This was most detrimental to the most promising solution, Atlas. Not only would we have to create an upload template or series of templates that holds the base data like sales orders and items, we would also have to have supplementary templates to handle dependent information and explicitly add all the missing information prior to the main import. This ends up being a very tedious process, where even one missing entry at any point could cause the entire process to fail. Additionally, because we were going to have a hard cutoff of when the other company would stop being used, we would have to monitor those dependencies until just prior to the import to make sure no new information was added.

During all this, we also found a fatal fault in both the Atlas plan and the Data Import/Export tool: In a few cases, the amount of information we need to import is massive. Since both the import/export tool and Atlas are dependent on Excel to operate, we were running into stability and performance issues using them. Items (the InventTable) in particular caused Excel to outright freeze or even crash, rendering both solutions effectively useless.

 
Being a developer, I began approaching it from a data-driven context. I had some requirements in mind when approaching it:

  • The tool had to be simple to use. Since I would not have access to use it in the production environment, I could not rely on a ‘developer interface’. This would have to include a progress indicator as well.
  • The tool should be able to identify missing information and be able to adapt either by translating or creating the information, depending on requirements.
  • The tool should allow users to specify what is imported. This can be accomplished either by providing an explicit ‘include’ list or exclude filter.
  • If some data is explicitly or implicitly to be added but it already exists (according to a table’s primary key), it should be assumed that the information that is already there is the correct version, and it should be skipped.
  • A log of some sort should be generated which shows what information was added (for review purposes post-import).

During the process, we were also able to identify the information we wanted to import:

  • Customers
  • Vendors
  • Items
  • Open Sales Orders
  • Open Purchase Orders
  • Open Quotes
  • Open Customer Balances
  • Open Vendor Balances
  • General Ledger Balances

Because we already had Atlas templates to handle open customer and vendor balances, we opted to use those for balances. Everything else would be done using this new tool.

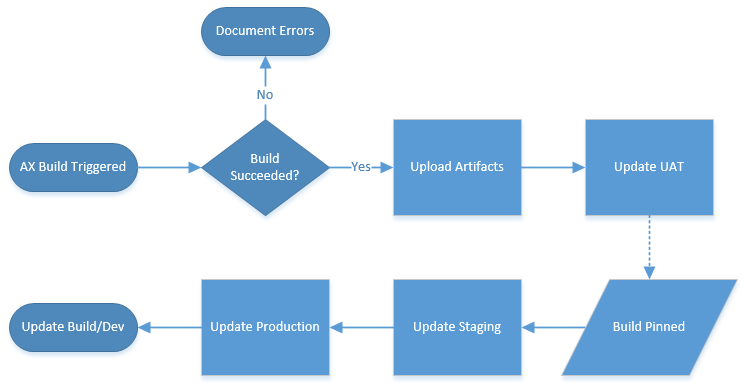
In the end, this is what we ended up with:

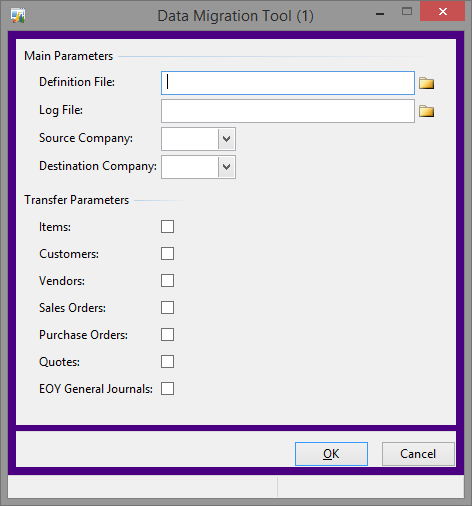
The definition file requested is an Excel file. The file has one tab for each of the items under ‘Transfer Parameters’ (except EOY General Journals). For each tab, there is simply a list of those objects – the Items tab has a list of items, the Sales Orders tab has a list of sales orders, etc. The user only need to check what information should be copied, not necessarily what was available in the data file. This allows us to run the tool multiple times, if necessary.

The log file that is generated is a CSV file. If there is no file specified, it instead writes everything to the infolog.

Prior to starting, the tool opens the definition file and counts how many of each object are in the list, giving us the basis of a progress dialog, and begins the transfer of each selected module one at a time. Each module is wrapped in a transaction to prevent any partial information from being added if there is an error. However, each module is handled independently so if one fails it simply proceeds to the next.

To accomplish the data transfer, I created a supporting data copy class. Each method of the class is named after a table, and takes a record of that table as a parameter. The methods are responsible for copying the record passed in (which should be from the Source Company) and inserting it into the Destination Company. It’s also responsible for ensuring that any dependencies necessary to copy that record are defined, and any sub-records related to the record are also defined. For example, CustTable ensures things like the Customer Group exist, copies the customer record, and also triggers the creation of the necessary entries in the Global Address Book. This creates an interesting web of dependencies which mimic the requirements by AX. This means you can effectively say “All I know is I have this sales order. Copy it over.” The web of requirements will cause the tool to verify the customer, financial dimensions and other properties exist (creating them if necessary), create the order header, and then add each of the lines (including the items if necessary, which can in turn require a BOM and further items and/or vendors) to the order.

Here is an example of one of the methods:

1
2
3
4
5
6
7
8
9
10
11
12
13
14
15
16
17
18
19
20
21
22
23
24
25
26
27
28
29
30
31
32
33
34
35
36
37
38
39
40
41
42
43
44
45
46
47
48
49
50
51
52
53
54
55
56
57
58
59
60
61
62
63
64
void inventDim(InventDim srcRecord)
{
InventDim dstRecord,
test;
Common temp;
DocuRef docuRef;
;

if (InventDim::exist(srcRecord.InventDimId) || InventDim::findDim(srcRecord).RecId != 0) return;

if (srcRecord.InventLocationId && !InventLocation::exist(srcRecord.InventLocationId))
{
changecompany(srcCompany)
{
temp = InventLocation::find(srcRecord.InventLocationId);
}

this.InventLocation(temp);
}
if (srcRecord.wmsLocationId && !WMSLocation::exist(srcRecord.wmsLocationId, srcRecord.InventLocationId))
{
changecompany(srcCompany)
{
temp = WMSLocation::find(srcRecord.wmsLocationId, srcRecord.InventLocationId);
}

this.WMSLocation(temp);
}
if (srcRecord.InventSiteId && !InventSite::exist(srcRecord.InventSiteId))
{
changecompany(srcCompany)
{
temp = InventSite::find(srcRecord.InventSiteId);
}

this.InventSite(temp);
}

dstRecord.InventDimId = srcRecord.InventDimId;
dstRecord.InventBatchId = srcRecord.InventBatchId;
dstRecord.wmsLocationId = srcRecord.wmsLocationId;
dstRecord.wmsPalletId = srcRecord.wmsPalletId;
dstRecord.InventSerialId = srcRecord.InventSerialId;
dstRecord.InventLocationId = srcRecord.InventLocationId;
dstRecord.ConfigId = srcRecord.ConfigId;
dstRecord.InventSizeId = srcRecord.InventSizeId;
dstRecord.InventColorId = srcRecord.InventColorId;
dstRecord.InventSiteId = srcRecord.InventSiteId;

dstRecord.insert(true);

this.writeLog(strfmt("Inventory dimension %1 added", dstRecord.InventDimId), "Inventory Dimension");

while select docuRef
where docuRef.RefTableId == srcRecord.TableId
&& docuRef.RefRecId == srcRecord.RecId
&& docuRef.RefCompanyId == srcCompany
{
docuRef.RefRecId = dstRecord.RecId;
docuRef.RefCompanyId = dstCompany;
docuRef.ActualCompanyId = dstCompany;
this.DocuRef(docuRef);
}
}

The method checks to make sure the record doesn’t already exist, checks the Site, Warehouse and Location to verify they exist (or create them if they don’t), adds the record, and then adds any document handling attachments associated with the record. We don’t use Batch, Pallet, Serial, Configuration, Size or Color, so we don’t bother to check those (if you do, you will need to follow the pattern to check those).

The biggest benefit to having a web like this is we don’t need to define all the dependencies across modules. For example, if we missed a customer in the customer list, and that customer was used on a sales order that is on the sales order list, the customer will still be added. To this end, we can focus on making each list stating what must be copied, even if it is not used anywhere else. If we have a list of items we must have no matter what, we put those on the list. But if we have other items we only want to bring over if they are used, we can leave them off and trust that sales orders, purchase orders or quotes will create them if needed. This significantly reduces overhead during the transfer - in our case, we were able to keep a considerable number of items from being added to the destination company, which helps reduce confusion to users of both companies.

After each record that is inserted, an entry is logged (either to the CSV file, or to the infolog) which specifies exactly what was added. If any warnings or errors are generated, they are also logged.

Needless to say, there is still a fair amount of overhead the way the data is copied: since AX is handling both the retrieving and inserting of the data, there are many calls to the changecompany function. However, in development testing we are still seeing transfer rates of about 20-30 records per second. Our testing data file contained just under 1000 objects to transfer, expanded to about 4700 records after applying the dependency web, and takes about 5 minutes to complete.

The only downside to the tool is portability. We cannot do something like this:

1
2
3
4
5
6
7
8
9
10
11
12
13
14
static void job1(Args _args)
{
CustTable sourceRecord,
destinRecord;
;

changeCompany(srcCompany)
{
sourceRecord = CustTable::find("Customer");
}

destinRecord = sourceCompany;
destinRecord.insert();
}

While this would be nice to have, and seems like it should work to copy all the fields from the source record to an empty buffer. However, this also copies fields like the RecId and DataAreaId; when you go to insert the record, a runtime error is thrown that the record already exists (which, based on those two fields, is does). Instead, the pattern needs to be:

1
2
3
4
5
6
7
8
9
10
11
12
13
14
15
16
17
18
19
20
21
static void job1(Args _args)
{
CustTable sourceRecord,
destinRecord;
;

changeCompany(sourceCompany)
{
sourceRecord = CustTable::find("Customer");
}

destinRecord.AccountNum = sourceRecord.AccountNum;
destinRecord.AccountStatement = sourceRecord.AccountStatement;
destinRecord.Address = sourceRecord.Address;
.
.
.
destinRecord.VendAccount = sourceRecord.VendAccount;
destinRecord.ZipCode = sourceRecord.ZipCode;
destinRecord.insert();
}

Each field needs to be called explicitly. This tends to be verbose, and any custom fields will also need to be added to the list. It could be possible to make this generic by using DictField and related classes, but doing that prohibits you from easily applying field translations (which we are doing for inventory locations and a few other places). Having to explicitly list all the fields means that if we add fields to any of the tables in the tool and want to use this tool again, it will need to be updated to include the new fields. This also means we can’t easily share this with another organization; it would require some amount of effort to make sure the field lists are correct. However, getting the list of fields is easy within the AOT: if you select all the fields on a table and right-click, navigate to “Add-Ins”, “Copy”, and “Name” you will have every field copied to your clipboard. Combine this with an Excel spreadsheet and you can have it format the list (each line being “destinRecord.” + fieldname + “= sourceRecord.” + fieldName; you can even write in something that moves each “=” to the nearest AX tab stop), which can be copied directly in with minimal effort.

After it was all said and done, the tool made it incredibly easy to copy the data from one company to another - all you need is the list of objects from your users.

I have also attached the XPO for the core class (not the data copy class) for reference, so you can get an idea as to how the process is organized.

Class_DataMigrationTool.xpo

Comment and share

Read the other posts in this series:
Why Create an AX Build Server/Process?
Part 1 - Intro
Part 2 - Build
Part 3 - Flowback
Part 4 - Promotion
Part 5 - Putting it all together
Part 6 - Optimizations
Part 7 - Upgrades

Up until now I have only been discussing what it has taken to get a Lifecycle Management system in place for AX 2009. The system needs to be reliable and adaptable while providing a comprehensive set of automated tasks to allow changes to AX to be propagated correctly. And like most programming projects, it was approached as a “Let’s get this in place so we have something as soon as we can”. However, inefficiencies can and do add up, so now it’s time to refactor our solution and make it more efficient.

For starters, we have replaced all of the scripts we use with PowerShell scripts for consistency. Since PowerShell is based on the .NET framework, we have the power and versatility of .NET. In some cases we are already using that power, but now we should really convert everything so there is consistency across the board.

In addition, we also noticed that many of scripts are redundant, with only minor changes from copy to copy. If something needs to change in the operations of one type of script, it would need to be changed in multiple places, increasing the chance of errors or inconsistencies. To fix that, we’ve generified majority of the scripts to so they are executed with parameters, which are defined by the specific build configurations. By extracting the differences to the TeamCity build configuration, we are able to turn each type of process (Promotion vs Flowback) into templates, allowing us to spin up a new process and only need to define the unique parameters for that process.

Instead of keeping the files segregated in their own process-specific folder, we’ve moved all of the generic scripts to the root of the version control repository:

We still have process-specific scripts, but those now only hold scripts that cannot be made generic, such as the SQL update scripts, which can’t be made generic as easily as the process scripts.

Here is an example of a script we have converted from a command line to PowerShell:

1
2
3
4
5
6
7
8
9
10
11
12
13
[CmdletBinding()]
param(
[Parameter(Mandatory=$True)]
[string]$fileLocation)

Write-Debug "Removing cache files from $fileLocation"
$extensionList = @("alc", "ali", "aoi")

foreach ($extension in $extensionList)
{
Remove-Item "$fileLocation\*.$extension"
Write-Host "$extension files removed"
}

In this case, we are passing in a folder location (in our case, the network share for the specific environment), iterating over a list of extensions and removing all files with those extensions from that location. In addition to being able to run for any of our environments, it also allows us to easily remove additional file types by simply adding another entry to the list. If we wanted to remove a different list of extensions for each environments (or the ability to add additional extensions to the default on a per-environment bases), we could extract that to be a parameter as well. However, since our goal is to have each environment be as close to production as possible, we opted not to do that.

Here is another example where we can take advantage of advanced processing to allow the script to run for multiple types of environments:

1
2
3
4
5
6
7
8
9
10
11
12
13
14
15
16
17
18
19
20
21
22
23
24
#Note: default values may not work, as empty strings may be passed. 
# Such strings should be treated as if nothing was passed.
[CmdletBinding()]
param(
[Parameter(Mandatory=$True)]
[string]$serverName,
[string]$processName)

#-----Housekeeping-----
#serverName can be comma delimited. If it is, break it out to a list of server names
if ($serverName.Contains(',')) { $serverNameList = $serverName.Split(',') } else { $serverNameList = $serverName }

# Set default values if nothing was passed in
if ([string]::IsNullOrEmpty($processName)) { $processName = 'Dynamics AX Object Server 5.0$*' }
#----/Housekeeping-----

#For each server, start the process
foreach ($server in $serverNameList)
{
Write-Debug "Starting $processName on $server"
Write-Host "Starting $processName on $server"
start-service -inputobject $(get-service -ComputerName "$server" -DisplayName "$processName") -WarningAction SilentlyContinue
Write-Host "$processName on $server started"
}

This script accepts two parameters, the server name (which is mandatory) and the process name (which is optional). Additionally, it can accept multiple servers as a CSV string - we use this for our production environment, which is load balanced across three servers. The servers are started in the same order as they are passed in, and you only need to define the process name if it is different than the default “Dynamics AX Object Server 5.0$*” (for example, if you have two environments on the same server, so you only shut down one of those environments). We’ve also been able to include debug messages to verify what actions are occurring when changing the scripts, and confirm if you want the action to execute. These messages do not appear when executed by TeamCity.

On the TeamCity side, this script would be configured as follows:

The %AosServer% in the script arguments section is a reference to a the configuration parameters of the build configuration:

Ultimately, these parameters drive the behavior of the entire process (which is why some parameters, like SqlServer, reference other parameters - because for this environment they are the same).

 
Finally, now that all the scripts are effectively applicable to all environments, it makes templating each of main processes easy, since all the scripts will take parameters. The parameters don’t need to have a value within the template, they only need to be defined - the configurations provide the actual values. You can see from the screenshot above that majority of the parameters are inherited from a template. We have the option to reset any of them to the default values (in this case, blank, as defined on the template), but we cannot delete them.

Each of the configuration parameters is also configurable within TeamCity so a value must be provided. If no value is provided, the configuration will not execute. The nice side of configuring a template this way is spinning up a new process is as easy as clicking a button and filling in some values:

 
From there, the only things you need to define are the triggers and dependencies, if you need more than those that are defined via the template.

Similar to the build scripts themselves, if there is a new process that needs to be added for each type of configuration (for example, a new step), we need only add it to the template, and it will automatically be added to all the configurations that inherit from that template.

 
The goal of all this is to decrease the amount of maintenance that needs to be done when a change needs to be made. By standardizing the language of all the scripts, less overall knowledge is needed to manage them; if a script generates an error, we need only fix one version of the script instead of 5; if a process is missing a step, we need only change the template configuration instead of 3-4 build configurations.

Here are samples for the scripts we have (not including the SQL files). Note that you may not need all these files:

UpdateAxDatabase.ps1
1
2
3
4
5
6
7
8
9
10
11
12
13
14
15
16
17
18
19
20
21
22
23
24
25
26
27
28
29
30
31
32
33
34
35
36
37
38
39
40
41
42
43
44
45
46
47
48
49
50
51
52
53
54
55
56
57
58
59
60
#Note: default values may not work, as empty strings may be passed. 
# Such strings should be treated as if nothing was passed.
[CmdletBinding()]
param(
[Parameter(Mandatory=$True)]
[string]$sqlServerHost,
[Parameter(Mandatory=$True)]
[string]$sqlCloneScript,
[string]$dbPermissionsScript,
[string]$sqlDatabaseName)

#-----Housekeeping-----
# Set default values if nothing was passed in
if ([string]::IsNullOrEmpty($sqlDatabaseName)) { $sqlDatabaseName = "DynamicsAx1" }
#----/Housekeeping-----

Add-PSSnapin SqlServerCmdletSnapin100 -ErrorAction SilentlyContinue | Out-Null
Add-PSSnapin SqlServerProviderSnapin100 -ErrorAction SilentlyContinue | Out-Null

Write-Host "Dropping DB Connections"
$query = "ALTER DATABASE $sqlDatabaseName SET SINGLE_USER WITH ROLLBACK IMMEDIATE"
Write-Debug "QUERY: $query"
Invoke-Sqlcmd -ServerInstance $sqlServerHost -Database "master" -Query $query -AbortOnError

Write-Host "Restoring database"
if ($sqlDatabaseName -ne "DynamicsAx1")
{
$moveCmd = " MOVE N'DynamicsAx1' TO N'C:\Program Files\Microsoft SQL Server\MSSQL10_50.MSSQLSERVER\MSSQL\DATA\$sqlDatabaseName.mdf', MOVE N'DynamicsAx1_log' TO N'C:\Program Files\Microsoft SQL Server\MSSQL10_50.MSSQLSERVER\MSSQL\DATA\${sqlDatabaseName}_log.LDF',"
}

$query = "RESTORE DATABASE [$sqlDatabaseName] FROM DISK = N'\\[network location]\DBBackup.bak' WITH FILE = 1,$moveCmd NOUNLOAD, REPLACE, STATS = 10"
Write-Debug "QUERY: $query"
Invoke-Sqlcmd -ServerInstance $sqlServerHost -Database "master" -Query $query -AbortOnError -QueryTimeout 65535 -Verbose
Write-Host "Compressing database"

#Simple backup recovery
$query = "ALTER DATABASE [$sqlDatabaseName] SET RECOVERY SIMPLE"
Write-Debug "QUERY: $query"
Invoke-Sqlcmd -ServerInstance $sqlServerHost -Database $sqlDatabaseName -Query $query -AbortOnError

#Shrink log file
$query = "DBCC SHRINKFILE (N'$DynamicsAx1_log' , 0, TRUNCATEONLY)"
Write-Debug "QUERY: $query"
Invoke-Sqlcmd -ServerInstance $sqlServerHost -Database $sqlDatabaseName -Query $query -AbortOnError

#Execute database change script(s)
Write-Host "Applying Database Changes"
Write-Debug "Executing $sqlCloneScript"
Invoke-Sqlcmd -ServerInstance $sqlServerHost -Database $sqlDatabaseName -InputFile $sqlCloneScript -AbortOnError -Verbose

if (![string]::IsNullOrEmpty($dbPermissionsScript))
{
Write-Debug "Executing $dbPermissionsScript"
Invoke-Sqlcmd -ServerInstance $sqlServerHost -Database $sqlDatabaseName -InputFile $dbPermissionsScript -AbortOnError
}

#Enable multi-user in case restore failed
$query = "ALTER DATABASE $sqlDatabaseName SET Multi_user"
Write-Debug "QUERY: $query"
Invoke-Sqlcmd -ServerInstance $sqlServerHost -Database $sqlDatabaseName -Query $query -AbortOnError

CopyAosFiles.ps1
1
2
3
4
5
6
7
[CmdletBinding()]
param(
[Parameter(Mandatory=$True)]
[string]$destination)

Write-Debug "Copying files to $destination"
xcopy "AX Build Files\*.*" $destination /Y /z

StartAxServers.ps1
1
2
3
4
5
6
7
8
9
10
11
12
13
14
15
16
17
18
19
20
21
22
23
24
#Note: default values may not work, as empty strings may be passed. 
# Such strings should be treated as if nothing was passed.
[CmdletBinding()]
param(
[Parameter(Mandatory=$True)]
[string]$serverName,
[string]$processName)

#-----Housekeeping-----
#serverName can be comma delimited. If it is, break it out to a list of server names
if ($serverName.Contains(',')) { $serverNameList = $serverName.Split(',') } else { $serverNameList = $serverName }

# Set default values if nothing was passed in
if ([string]::IsNullOrEmpty($processName)) { $processName = 'Dynamics AX Object Server 5.0$*' }
#----/Housekeeping-----

#For each server, start the process
foreach ($server in $serverNameList)
{
Write-Debug "Starting $processName on $server"
Write-Host "Starting $processName on $server"
start-service -inputobject $(get-service -ComputerName "$server" -DisplayName "$processName") -WarningAction SilentlyContinue
Write-Host "$processName on $server started"
}

BackupProdSql.ps1
1
2
3
4
5
6
7
$rootSourceLocation = "\\[Network location]"
$dbBackupFileName = "DBBackup.bak"
$serverName = "[Server Name]"
$dbBackupFile = $rootSourceLocation + $dbBackupFileName
$query = "BACKUP DATABASE [DynamicsAx1] TO DISK = N'" + $dbBackupFile + "' WITH INIT, NOUNLOAD, NAME = N'DynamicsAx1 Clone Backup', NOSKIP, STATS = 10, NOFORMAT"

sqlcmd -E -S $serverName -d master -Q $query | Out-Host

CleanVcDirectory.ps1
1
2
3
4
5
6
7
[CmdletBinding()]
param(
[Parameter(Mandatory=$True)]
[string]$fileLocation)

Write-Debug "Removing XPO files from $fileLocation"
Get-ChildItem $fileLocation -Recurse -Include "*.xpo" -Force | Remove-Item

CompileAx.ps1
1
ax32.exe -startupcmd=compileall_- | Out-Null

CopyVersionControlNotes.ps1
1
2
3
4
5
6
7
8
9
10
11
12
13
14
15
16
17
18
19
20
21
22
23
24
25
26
27
28
29
30
31
32
33
34
35
36
37
38
39
40
41
42
43
44
45
46
47
48
49
50
51
52
53
54
55
56
57
58
59
60
61
62
63
64
65
66
67
68
69
70
71
72
73
74
75
76
77
78
79
80
81
82
83
84
85
#Note: default values may not work, as empty strings may be passed. 
# Such strings should be treated as if nothing was passed.
[CmdletBinding()]
param(
[Parameter(Mandatory=$True)] [Int32] $dependencyBuildId,
[Parameter(Mandatory=$True)] [string]$sourceSqlServer,
[string]$sourceSqlName,
[Parameter(Mandatory=$True)] [string]$destinationSqlServer,
[string]$destinationSqlName)

#-----Housekeeping-----
# Set default values if nothing was passed in
if ([string]::IsNullOrEmpty($sourceSqlName)) { $sourceSqlName = $sourceSqlServer }
if ([string]::IsNullOrEmpty($destinationSqlName)) { $destinationSqlName = $destinationSqlServer }
#----/Housekeeping-----

Write-Debug "Transfering build $dependencyBuildId version control information from $sourceSqlServer ($sourceSqlName) to $destinationSqlServer ($destinationSqlName)"
Write-Host "##teamcity[message text='Loading build information for $dependencyBuildId' status='NORMAL']"

#Load XML assemblies
[Reflection.Assembly]::LoadWithPartialName("System.Xml.Linq") | Out-Null
[Reflection.Assembly]::LoadWithPartialName("System.Linq") | Out-Null
Add-PSSnapin SqlServerCmdletSnapin100 -ErrorAction SilentlyContinue | Out-Null
Add-PSSnapin SqlServerProviderSnapin100 -ErrorAction SilentlyContinue | Out-Null
#/assemblies

$buildInfo = [System.Xml.Linq.XDocument]::Load("http://[TeamCity URL]/guestAuth/app/rest/builds/id:$dependencyBuildId");
Write-Debug $buildInfo
$buildNum = $buildInfo.Root.Attribute("number").Value;
Write-Debug $buildNum
$buildDate = [DateTime]::ParseExact(($buildInfo.Root.Descendants("finishDate") | %{$_.Value}), "yyyyMMddTHHmmsszzz", [System.Globalization.CultureInfo]::InvariantCulture).ToUniversalTime().ToString("s");
write-debug $buildDate

if ($buildInfo.Root.Descendants("timestamp").Count -gt 0)
{
$apprvDate = [DateTime]::ParseExact(($buildInfo.Root.Descendants("timestamp") | %{$_.Value}), "yyyyMMddTHHmmsszzz", [System.Globalization.CultureInfo]::InvariantCulture).ToUniversalTime().ToString("s");
Write-Debug $apprvDate
}
else
{
$apprvDate = Get-Date "1/1/1900 00:00:00"
}

#Update Build information in the environment
$query = "UPDATE SysEnvironment SET BUILDNO = $buildNum, BUILDDATE = '$buildDate', APPROVEDDATE = '$apprvDate'"
Invoke-Sqlcmd -ServerInstance $destinationSqlServer -Database "DynamicsAx1" -Query $query

#Pass along Version Control Items table
$query = "INSERT INTO [DynamicsAx1].[dbo].[SYSVERSIONCONTROLMORPHXITE2541]
SELECT DISTINCT src.*
FROM [$sourceSqlName].[DynamicsAx1].[dbo].[SYSVERSIONCONTROLMORPHXITE2541] src
LEFT JOIN [$destinationSqlName].[DynamicsAx1].[dbo].[SYSVERSIONCONTROLMORPHXITE2541] dest
ON src.RECID = dest.RECID
LEFT OUTER JOIN [$sourceSqlName].[DynamicsAx1].[dbo].[SYSVERSIONCONTROLMORPHXREV2543] rev
ON rev.ITEMPATH = src.ITEMPATH
WHERE dest.RECID IS NULL and rev.CREATEDDATETIME < '$buildDate'"

Invoke-Sqlcmd -ServerInstance $destinationSqlServer -Database "DynamicsAx1" -Query $query

#Pass along Version Control Lock table
$query = "INSERT INTO [DynamicsAx1].[dbo].[SYSVERSIONCONTROLMORPHXLOC2542]
SELECT src.*
FROM [$sourceSqlName].[DynamicsAx1].[dbo].[SYSVERSIONCONTROLMORPHXLOC2542] src
LEFT JOIN [$destinationSqlName].[DynamicsAx1].[dbo].[SYSVERSIONCONTROLMORPHXLOC2542] dest
ON src.RECID = dest.RECID
WHERE dest.RECID IS NULL and src.CREATEDDATETIME < '$buildDate'"

Invoke-Sqlcmd -ServerInstance $destinationSqlServer -Database "DynamicsAx1" -Query $query

#Pass along Version Control Revision table
$query = "INSERT INTO [DynamicsAx1].[dbo].[SYSVERSIONCONTROLMORPHXREV2543]
SELECT src.*
FROM [$sourceSqlName].[DynamicsAx1].[dbo].[SYSVERSIONCONTROLMORPHXREV2543] src
LEFT JOIN [$destinationSqlName].[DynamicsAx1].[dbo].[SYSVERSIONCONTROLMORPHXREV2543] dest
ON src.RECID = dest.RECID
WHERE dest.RECID IS NULL and src.CREATEDDATETIME < '$buildDate'"

Invoke-Sqlcmd -ServerInstance $destinationSqlServer -Database "DynamicsAx1" -Query $query

#Update RecID sequences for above tables
foreach ($i in (2541, 2542, 2543))
{
$query = "UPDATE [DynamicsAx1].[dbo].[SYSTEMSEQUENCES]
SET NEXTVAL = (SELECT NEXTVAL FROM [$sourceSqlName].[DynamicsAx1].[dbo].[SYSTEMSEQUENCES] src
WHERE src.TABID = $i)
WHERE TABID = $i"

Invoke-Sqlcmd -ServerInstance $destinationSqlServer -Database "DynamicsAx1" -Query $query
}

ExportAot.ps1
1
2
3
4
5
6
7
8
9
10
11
12
13
14
15
16
17
18
19
20
21
22
23
24
#Note: default values may not work, as empty strings may be passed. 
# Such strings should be treated as if nothing was passed.
[CmdletBinding()]
param(
[Parameter(Mandatory=$True)]
[string]$server,
[Parameter(Mandatory=$True)]
[string]$exportLocation,
[string]$instanceName,
[string]$instancePort)

#-----Housekeeping-----
#serverName can be comma delimited. If it is, only take the first in the list
if ($server.Contains(',')) { $server = $server.Split(',')[0] }

# Set default values if nothing was passed in
if ([string]::IsNullOrEmpty($instanceName)) { $instanceName = "DynamicsAx1" }
if ([string]::IsNullOrEmpty($instancePort)) { $instancePort = "2712" }
#----/Housekeeping-----

Write-Debug "Exporting AOT From $instanceName@$server`:$instancePort to $exportLocation"

$args = @("-startupCmd=aotexport_$exportLocation", "-aos2=$instanceName@$server`:$instancePort")
ax32.exe $args | Out-Null

MercurialCommit.ps1
1
2
3
4
5
6
7
8
9
10
11
12
13
14
15
16
17
18
19
20
21
22
23
24
25
26
27
28
29
30
31
32
33
34
35
36
37
38
39
40
41
42
43
44
45
46
47
48
49
50
51
52
53
54
#Note: default values may not work, as empty strings may be passed. 
# Such strings should be treated as if nothing was passed.
[CmdletBinding()]
param(
[Parameter(Mandatory=$True)]
[int32] $buildNum,
[Parameter(Mandatory=$True)]
[string]$internalBuildId,
[Parameter(Mandatory=$True)]
[string]$sqlServerHost,
[string]$sqlDatabaseName,
[boolean]$pinned = $false)

#-----Housekeeping-----
# Set default values if nothing was passed in
if ([string]::IsNullOrEmpty($sqlDatabaseName)) { $sqlDatabaseName = "DynamicsAx1" }

$pinnedStr = if ($pinned -eq $true) {",pinned:true"} else {""}
#----/Housekeeping-----

#Load XML assemblies
[Reflection.Assembly]::LoadWithPartialName("System.Xml.Linq") | Out-Null
[Reflection.Assembly]::LoadWithPartialName("System.Linq") | Out-Null
Add-PSSnapin SqlServerCmdletSnapin100 -ErrorAction SilentlyContinue | Out-Null
Add-PSSnapin SqlServerProviderSnapin100 -ErrorAction SilentlyContinue | Out-Null
#/assemblies

$xmlFile = "http://[TeamCity URL]/guestAuth/app/rest/builds/buildType:(id:$internalBuildId),canceled:any,running:false$pinnedStr"
Write-Debug "Loading $xmlFile"
$buildInfo = [System.Xml.Linq.XDocument]::Load($xmlFile);
$buildDate = [DateTime]::ParseExact(($buildInfo.Root.Descendants("startDate") | %{$_.Value}), "yyyyMMddTHHmmsszzz", [System.Globalization.CultureInfo]::InvariantCulture).ToUniversalTime().ToString("s");

Write-Debug "Retrieving commits from $sqlServerHost.$sqlDatabaseName"
$commits = Invoke-Sqlcmd -ServerInstance $sqlServerHost -Database $sqlDatabaseName -Query "SELECT DISTINCT CAST(COMMENT_ as NVARCHAR(max)) FROM SYSVERSIONCONTROLMORPHXREV2543 WHERE CREATEDDATETIME > '$buildDate' ORDER BY CAST(COMMENT_ AS NVARCHAR(max)) ASC";
if (($commits | measure).Count -gt 0)
{
$commits | ForEach-Object -Process { $commitMsgs = $commitMsgs + "`n" + $_.Column1 };
}
else
{
# If there are no commit messages then the changes must be the
# automatic reversion due to unpinned builds
# NOTE: This will not show in a commit unless there are actual changes to be committed
$commitMsgs = "Reverted unapproved or unpinned changes.";
}

$message = "Build ${buildNum}: $commitMsgs"
Write-Debug "Adding to VC + Committing:`n$message"
hg addremove | Out-Host
hg commit -m "Build ${buildNum}: $commitMsgs" -u AXVControl | Out-Host
if (!$?) { return; }

Write-Debug "Pushing commit to remote repository"
hg push | Out-Host

ParseCompilerResults.ps1
1
2
3
4
5
6
7
8
9
10
11
12
13
14
15
16
17
18
19
20
21
22
23
24
25
26
27
28
29
30
31
32
33
34
35
36
37
38
39
40
41
42
43
44
45
46
47
48
49
50
51
52
53
54
55
56
57
trap
{
# On any thrown error, return with a non-zero exit code
exit 1
}

if ($env:TEAMCITY_VERSION) {
# When PowerShell is started through TeamCity's Command Runner, the standard
# output will be wrapped at column 80 (a default). This has a negative impact
# on service messages, as TeamCity quite naturally fails parsing a wrapped
# message. The solution is to set a new, much wider output width. It will
# only be set if TEAMCITY_VERSION exists, i.e., if started by TeamCity.
$host.UI.RawUI.BufferSize = New-Object System.Management.Automation.Host.Size(8192,50)
}

[xml]$xml = (Get-Content "C:\Users\Public\Microsoft\Dynamics Ax\Log\AxCompileAll.xml")

$ns = @{ Table = "urn:www.microsoft.com/Formats/Table" }

$errorNodes = Select-Xml -XPath "/AxaptaCompilerOutput/Table:Record[Table:Field[@name='SysCompilerSeverity'] = 0]" -Xml $xml -Namespace $ns
$warningNodes = Select-Xml -XPath "/AxaptaCompilerOutput/Table:Record[Table:Field[@name='SysCompilerSeverity'] > 0 and Table:Field[@name='SysCompilerSeverity'] < 255]" -Xml $xml -Namespace $ns
$todoNodes = Select-Xml -XPath "/AxaptaCompilerOutput/Table:Record[Table:Field[@name='SysCompilerSeverity'] = 255]" -Xml $xml -Namespace $ns

$success = $true

if (($errorNodes | Measure-Object).Count -gt 0)
{
foreach ($node in $errorNodes)
{
$success = $false
$nodePath = ($node.Node.Field | ? { $_.name -eq "TreeNodePath" }).'#text'
$message = ($node.Node.Field | ? { $_.name -eq "SysCompileErrorMessage" }).'#text'

write-host "##teamcity[message text='${nodePath}: $message' status='ERROR']"
}
}

foreach ($node in $warningNodes)
{
$nodePath = ($node.Node.Field | ? { $_.name -eq "TreeNodePath" }).'#text'
$message = ($node.Node.Field | ? { $_.name -eq "SysCompileErrorMessage" }).'#text'

write-host "##teamcity[message text='${nodePath}: $message' status='WARNING']"
}

foreach ($node in $todoNodes)
{
$nodePath = ($node.Node.Field | ? { $_.name -eq "TreeNodePath" }).'#text'
$message = ($node.Node.Field | ? { $_.name -eq "SysCompileErrorMessage" }).'#text'

write-host "${nodePath}: $message"
}

if ($success -eq $false)
{
throw $_
}

RemoveAosCacheFiles.ps1
1
2
3
4
5
6
7
8
9
10
11
12
[CmdletBinding()]
param(
[Parameter(Mandatory=$True)]
[string]$fileLocation)
Write-Debug "Removing cache files from $fileLocation"
$extensionList = @("alc", "ali", "aoi")

foreach ($extension in $extensionList)
{
Remove-Item "$fileLocation\*.$extension"
Write-Host "$extension files removed"
}

StopAxServers.ps1
1
2
3
4
5
6
7
8
9
10
11
12
13
14
15
16
17
18
19
20
21
22
23
24
#Note: default values may not work, as empty strings may be passed. 
# Such strings should be treated as if nothing was passed.
[CmdletBinding()]
param(
[Parameter(Mandatory=$True)]
[string]$serverName,
[string]$processName)

#-----Housekeeping-----
#serverName can be comma delimited. If it is, break it out to a list of server names
if ($serverName.Contains(',')) { $serverNameList = $serverName.Split(',') } else { $serverNameList = $serverName }

# Set default values if nothing was passed in
if ([string]::IsNullOrEmpty($processName)) { $processName = 'Dynamics AX Object Server 5.0$*' }
#----/Housekeeping-----

#For each server, stop the process
foreach ($server in $serverNameList)
{
Write-Debug "Stopping $processName on $server"
Write-Host "Stopping $processName on $server"
stop-service -inputobject $(get-service -ComputerName "$server" -DisplayName "$processName") -WarningAction SilentlyContinue
Write-Host "$processName on $server stopped."
}

SynchronizeDataDictionary.ps1
1
2
3
4
5
6
7
8
9
10
11
12
13
14
15
16
17
18
19
20
21
#Note: default values may not work, as empty strings may be passed. 
# Such strings should be treated as if nothing was passed.
[CmdletBinding()]
param(
[Parameter(Mandatory=$True)]
[string]$server,
[string]$instanceName,
[string]$instancePort)

#-----Housekeeping-----
#serverName can be comma delimited. If it is, only take the first in the list
if ($server.Contains(',')) { $server = $server.Split(',')[0] }

# Set default values if nothing was passed in
if ([string]::IsNullOrEmpty($instanceName)) { $instanceName = "DynamicsAx1" }
if ([string]::IsNullOrEmpty($instancePort)) { $instancePort = "2712" }
#----/Housekeeping-----

Write-Debug "Performing Data Dictionary Sync on $instanceName@$server`:$instancePort"
$args = @("-startupcmd=synchronize", "-aos2=$instanceName@$server`:$instancePort")
Ax32.exe $args | Out-Null

Working on AX Lifecycle Management has shown a lot as far as how the AX infrastructure has been set up. While I’m sure this system may only have limited use in AX 2012 or AX 7 (if any at all), having a formal process has allowed me as a developer to focus more of my time on actual development without having to worry about how it is going to be deployed into our production environments. Having an automated environment update process allows me to track how changes impact the environment more realistically, so code changes are less likely to have problems when they do finally reach production. The built-in audit trail is fantastic for showing to auditors, both internal and external, what happened and when. And while we haven’t had the need to roll back an update it’s nice to know the possibility still exists if it is needed.

Ultimately, the system we have built is a very simple one - easy to understand, easy to explain, easy to show what exactly is going on. But the impact it is making has been huge - mostly because of its simplicity. I hope this series inspires others to implement similar systems for their organizations.

Comment and share

Read the other posts in this series:
Why Create an AX Build Server/Process?
Part 1 - Intro
Part 2 - Build
Part 3 - Flowback
Part 4 - Promotion
Part 5 - Putting it all together
Part 6 - Optimizations
Part 7 - Upgrades

In our implementation, we use TeamCity to manage each of the individual processes. I’ve discussed how the system not only makes it easier to migrate code through a development process, but also how to update the systems earlier in the cycle (like Dev) to reflect Production without any manual intervention. Both of these tasks benefit by having the entire process pre-scripted, allowing for the smallest amount of downtime so users and developers alike can get back to work as quickly as possible.

This post is now going to bring all the individual pieces together, to make a fully unified Lifecycle Management system. Linking all the processes together is where TeamCity really shines. With Build Triggers and Artifact Dependencies, we can automate the entire process so users don’t have to do anything - the system just does it.

First, let’s go over one new process I have not yet discussed: the data update.

Data Update

Some of our environments (most notably Staging) have a requirement to be updated to match production on a daily basis. The remaining environments do not have to be in a production state every day, but when they are updated they should reflect the closest state to production as possible. This requires the production database to be backed up nightly. To help with this, we created a new build configuration. We did not put it into one of the other configurations because it should be an independent process.

The data update configuration only has one step: Backing up the production database. This is a simple PowerShell script:

BackupDatabase.ps1
1
2
3
4
5
6
7
8
$rootSourceLocation = "\\[Backup Network location]\"
$dbBackupFileName = "DBBackup.bak"
$serverName = "[AX SQL Server Name]"

$dbBackupFile = $rootSourceLocation + $dbBackupFileName

$query = "BACKUP DATABASE [DynamicsAx1] TO DISK = N'" + $dbBackupFile + "' WITH INIT, NOUNLOAD, NAME = N'DynamicsAx1 Clone Backup', NOSKIP, STATS = 10, NOFORMAT"
sqlcmd -E -S $serverName -d master -Q $query

That’s all there is to it.

Now that we have all the processes defined, let’s examine how we want each of the pieces to execute. To help me visualize what should be happening when, I created this flowchart:

Each box represents one of the processes we have discussed previously. The round spots represent when each process line should begin. It should be noted that we also allow each individual task to be run manually. If anything is started manually, the next process in line will still fire. For example, if I trigger a Flowback: Dev manually, Flowback: Beta will automatically run when it has completed. Likewise, if I run a Promotion: Staging manually, it will be followed by a Build Process and Promotion: UAT.

The numbers in each box represent the total time to run the process (on average). This helps to determine the trigger times by working backwards from when we want the process to complete.

As you can see, we want there to be a data update, staging promotion, and build process every night, and we want a UAT Promotion to occur after every Build process (so we can begin testing the changes immediately). Dev and Beta are both manually triggered by developers, but when we update Dev we want to make sure Beta is updated with it so they have the same base code.

 
Now that we have an idea of how each of the individual tasks relate to each other, we can begin scheduling the tasks in TeamCity, using the triggers section of each build configuration:

Process Trigger Type Description
Flowback: Dev None
Flowback: Beta Finish Build Trigger Wait for successful build in AX Lifecycle: AX Flowback: Dev
AX Data Update Schedule Trigger Cron command: 0 0 00 1,3-7 * (Server Time Zone)
Promotion: Staging Finish Build Trigger Wait for successful build in AX Lifecycle: AX Data Update
AX Build Process Finish Build Trigger Wait for successful build in AX Lifecycle: AX Promotion: Staging
Promotion: UAT Finish Build Trigger Wait for successful build in AX Lifecycle: AX Build Process
Promotion: Production Schedule Trigger Weekly on Sunday at 22:30 (Server Time Zone)
Flowback: Build Finish Build Trigger Wait for successful build in AX Lifecycle: AX Promotion: Production
Promotion: Staging Finish Build Trigger Wait for successful build in AX Lifecycle: AX Flowback: Build


The Schedule Triggers mean the process starts at specific times. Because we want to execute the Data Update process 6 out of the 7 days per week, instead of creating one trigger for each day, we just use a simple Cron statement to execute on certain days (in this case, Tuesday through Sunday). It should also be noted that the Data Update starts running at midnight, compared to the Production Promotion, which starts at 11:30pm, so the Data Update schedule must be offset by one day or multiple processes with overlap each other.

The Finish Build Triggers wait for the particular event (in this case, a successful execution of the previous process), and then add themselves to the queue. If you have two processes with the same Finish Build Trigger, it’s more or less random which one will start first, but because our process is linear in nature, we don’t have to worry about that.

One of the nice side-effects about setting up triggers this way is they only run on successful completion. If for some reason the Promotion: Staging fails, nothing after it runs. Similarly, if a Build Process itself fails, UAT won’t be updated with the failed code. We still need to address the failure, of course, but by stopping the process line prematurely, no unnecessary work is done.

I should also note that the Production Promotion process includes a step that is identical to the data update. This is because after a production promotion, we want the Build server to update with the new code and data. However, we only want it to update after a production promotion. If we attempted to chain the Data Update after production promotion, and the build flowback after that, Build would be updated every night, which is not a good thing when we try to accumulate changes over the course of a week. This way, we can make sure Build is only updated once a week, and the data is still updated nightly.


Now that everything is scheduled, all that is left is for the actual developer work to finish. This process was established to help optimize the development process we have established internally:

  1. Request comes in, any missing information gathered by Project Manager
  2. Work assigned to developer by Project Manager
  3. Developer makes changes in Dev
  4. Developer loads changes in Beta, reviews with User for functionality testing
  5. User approves functionality testing
  6. Developer loads changes (with version control information) into Build
  7. Developer triggers Build Process. Build + Automatic push to UAT
  8. Project Manager reviews changes with user in UAT
  9. Project Manager accepts changes
  10. Approved changes pushed to Staging nightly
  11. Approved changes pushed to Production weekly

There are exceptions to some of these steps (for example, Beta and the associated user review is normally reserved for large projects with many working parts; in some cases, the user may not even be involved until UAT), but for the most part this is our workflow.

Some of the nice benefits we’ve enjoyed since implementing this include:

  • Increased SOX compliance: the developer cycle (Dev -> Beta -> Build) is independent of the production cycle (Build -> UAT -> Staging -> Production).
  • The code deployment processes are all well-defined and automated, so there is no risk “forgetting” to do a step, like copy version control information.
  • All changes are traceable: If you have a production build number, you can see what the build process number is, and all the changes related to that build. There is also built-in auditing features that state who triggered a specific process, and when.
  • If something goes wrong and you need to rollback to a previous version, it’s as easy as triggering a custom Production Promotion process.

I do hope the information in this series helps others to see the value in implementing a Lifecycle Management process for AX 2009, and gives some ideas on how it can be accomplished relatively quickly and painlessly.

Comment and share

Read the other posts in this series:
Why Create an AX Build Server/Process?
Part 1 - Intro
Part 2 - Build
Part 3 - Flowback
Part 4 - Promotion
Part 5 - Putting it all together
Part 6 - Optimizations
Part 7 - Upgrades

In this installment of the Automated Builds and Code Deployment series, I’m going to cover what is probably the most important component of the build process: Promotion.

The Promotion process should be the only way new code leaves one environment and enters another. Our promotion cycle is fairly straightforward: Dev => Beta => Build => UAT => Staging => Production. Projects should hit most, if not all, of these environments and must go through them in that order. We have found that Beta is really the only environment that can be skipped, but should only be skipped for very minor changes (for example, adding a single field from an existing data source on a report).

Again, we are using the Template feature of TeamCity 8.0+ to help manage our configurations. Similar to our Flowback processes, we have a template definition of a variable, Working Directory, which needs to be defined in the implementation of each build configuration.

Our non-production promotion process consists of 7 steps:

  1. Shut down AX Server Process
  2. Copy Build files
  3. Remove AOS temp/cache files
  4. Update AX database
  5. Copy Version Control attributes
  6. Start AX Server Process
  7. Synchronize Data Dictionary

The production promotion process is very similar, with 7 steps, but with some slight changes:

  1. Shut down AX Server Process
  2. Copy Build files
  3. Remove AOS temp/cache files
  4. Copy Version Control attributes
  5. Start AX Server Process
  6. Synchronize Data Dictionary
  7. Backup Production Database

As you can see, the biggest difference is the Production Promotion does not update the database (for obvious reasons), but instead backs it up. I’ll go into more details in my next post, which will bring everything together and outline how each of the pieces interact with each other as a total Lifecycle Management system.

Process Configuration

Each individual process has an Artifact Dependency on the AX Build Process. The process itself should define the criteria for which build it should take. For example:

  • UAT Promotion should take the last successful build
  • Staging and Production should take the last pinned build

During execution, TeamCity will automatically lookup the last build that meets the criteria and download the artifacts that were saved in that build.
Additionally, we have the artifact paths set to

1
BuildFiles.zip!*.*=>AX Build Files

This means the build agent that is running this will automatically extract all the files it finds in the BuildFiles zip file (which is created during the build process) and extract them to a folder named AX Build Files. This path will be referenced in future scripts so we can move the files where they need to go.

Stop AX Server Process

Because we will be manipulating the server binaries, our first step is to shut down the AX server (or servers). Originally, we used a batch script for this step. However, because we cannot specify the timeout, we would sometimes run into issues where the service did not finish shutting down or starting up before the rest of the process occurred. So instead we are using a simple PowerShell script:

StopAxServers.ps1
1
2
3
stop-service -inputobject $(get-service -ComputerName "[AOS Server 2]" -DisplayName "Dynamics AX Object Server 5.0$*") -WarningAction SilentlyContinue
stop-service -inputobject $(get-service -ComputerName "[AOS Server 1]" -DisplayName "Dynamics AX Object Server 5.0$*") -WarningAction SilentlyContinue
stop-service -inputobject $(get-service -ComputerName "[AX Load Balancer]" -DisplayName "Dynamics AX Object Server 5.0$*") -WarningAction SilentlyContinue

As you can see, we are stopping each process sequentially and in reverse order. In reality you can stop the processes in any order. Also, because we are using PowerShell stop-service, the script will naturally wait until the service has finished stopping before moving to the next line. If something causes the AOS Server 2 to not stop at all, AX will still be available because Server 1 and the Load Balancer are still up. The -WarningAction flags will prevent the warning messages (“WARNING: Waiting for service ‘[Service name]’ to finish stopping…”) from showing the TeamCity logs.

Copy Build Files

As mentioned before, the files from the build are automatically extracted to a folder that we can reference. We cannot just extract them to the AX Server folder because the extraction process occurs before the first defined step, meaning the files will be in use. Instead, we will just copy them there now that the server is offline:

CopyBuildFiles.bat
1
2
3
4
5
6
7
8
9
10
11
@echo off
REM Resources
set fileSource="..\..\AX Build Files\*.*"
set fileDestin=\\[server name]\DynamicsAx1\
REM /Resources

xcopy %fileSource% %fileDestin% /Y /z
IF ERRORLEVEL 1 ECHO ##teamcity[message text='No files to copy' status='ERROR']
IF ERRORLEVEL 2 ECHO ##teamcity[message text='File copy terminated prematurely' status='ERROR']
IF ERRORLEVEL 4 ECHO ##teamcity[message text='Initialization Error' status='ERROR']
IF ERRORLEVEL 5 ECHO ##teamcity[message text='Disk write error' status='ERROR']

The AX Build Files folder will be in the root build directory, which is two levels up from where the script resides. Additionally, we have the server files shared across the network to the build server, which allows us to update all the files remotely. There is also some generic error handling at the bottom, since xcopy won’t actively throw any error codes if there was an issue.

Remove AOS temp/cache files

This step is another simple script which removes the now old temp and cache files the AX server uses to help make things run faster. If they aren’t removed, the server may continue to use the old code, which could cause issues for uses. These files will be re-built with the new codebase once the first AX server starts up.

RemoveTempFiles.bat
1
2
3
4
5
6
7
8
@echo off
REM Resources
set fileLoc=\\[server name]\DynamicsAx1
REM /Resources

del "%fileLoc%\*.alc"
del "%fileLoc%\*.ali"
del "%fileLoc%\*.aoi"

As you can see, I’m only targeting some of the temp/cache files:
ALC = Application Label Cache files
ALI = Application Label Index files
AOI = Application Object Index files

You can additionally remove more files if you like, but only keep to those ending with the letter C or I. You can find more details on what each file extension means at http://www.artofcreation.be/2009/10/27/application-file-extensions/.

Update AX Database

This is only for non-production promotions, and is very similar to the Database Update step of the Flowback processes. We restore the current backup of production into the specific server’s database, and run a SQL update script that points necessary system values to the correct values for the environment.

Copy Version Control Attributes

This is probably one of the more tricky scripts. Because we use the built-in AX MorphX Version Control system, and this information is only entered with the code back in Build, we need a way of bringing the information forward to each system. We use a PowerShell script to manage this process.

Additionally, we have a modification in our system which tells us which the internal build number that the system is running, and when it was originally created/approved:

This information is stored in the database on the SysEnvironment table, and since it directly relates to the version information, we update it during this process. All the information comes directly from TeamCity using the REST API. Additionally, each database server is linked with the previous database server in line (IE, UAT has a link to Build, Staging has a link to UAT, and Production has a link to Staging).

In this case, the script takes a number, which represents the build ID (not to be confused with the build number). This is passed into the script from the TeamCity configuration.

CopyVersionControlInfo.ps1
1
2
3
4
5
6
7
8
9
10
11
12
13
14
15
16
17
18
19
20
21
22
23
24
25
26
27
28
29
30
31
32
33
34
35
36
37
38
39
40
41
42
43
44
45
46
47
48
49
50
51
52
53
54
55
56
57
58
59
60
61
62
63
64
65
66
param([Int32]$buildId)

Write-Host "##teamcity[message text='Loading build information for $buildId' status='NORMAL']"

#Load XML assemblies
[Reflection.Assembly]::LoadWithPartialName("System.Xml.Linq") | Out-Null
[Reflection.Assembly]::LoadWithPartialName("System.Linq") | Out-Null
Add-PSSnapin SqlServerCmdletSnapin100 -ErrorAction SilentlyContinue | Out-Null
Add-PSSnapin SqlServerProviderSnapin100 -ErrorAction SilentlyContinue | Out-Null
#/assemblies

#Local vars
$sourceSqlServer = "[Source DB Server]"
$sourceSqlName = "[Source DB Name]"
$destinationSqlServer = "[Destination DB Server]"
$destinationSqlName = "[Destination DB Name]"
#/Local vars

$buildInfo = [System.Xml.Linq.XDocument]::Load("http://[TeamCity Build Server Root URL]/guestAuth/app/rest/builds/id:$buildId");
$buildNum = $buildInfo.Root.Attribute("number").Value;
$buildDate = [DateTime]::ParseExact(($buildInfo.Root.Descendants("finishDate") | %{$_.Value}), "yyyyMMddTHHmmsszzz", [System.Globalization.CultureInfo]::InvariantCulture).ToUniversalTime().ToString("s");
$apprvDate = [DateTime]::ParseExact(($buildInfo.Root.Descendants("timestamp") | %{$_.Value}), "yyyyMMddTHHmmsszzz", [System.Globalization.CultureInfo]::InvariantCulture).ToUniversalTime().ToString("s");


#Update Build information in the environment
$query = "UPDATE SysEnvironment SET BUILDNO = $buildNum, BUILDDATE = '$buildDate', APPROVEDDATE = '$apprvDate'"
Invoke-Sqlcmd -ServerInstance $destinationSqlServer -Database "DynamicsAx1" -Query $query

#Pass along Version Control Items table
$query = "INSERT INTO [DynamicsAx1].[dbo].[SYSVERSIONCONTROLMORPHXITE2541]
SELECT DISTINCT src.*
FROM [$sourceSqlName].[DynamicsAx1].[dbo].[SYSVERSIONCONTROLMORPHXITE2541] src
LEFT JOIN [$destinationSqlName].[DynamicsAx1].[dbo].[SYSVERSIONCONTROLMORPHXITE2541] dest
ON src.RECID = dest.RECID
LEFT OUTER JOIN [$sourceSqlServer].[DynamicsAx1].[dbo].[SYSVERSIONCONTROLMORPHXREV2543] rev
on rev.ITEMPATH = src.ITEMPATH
WHERE dest.RECID IS NULL and rev.CREATEDDATETIME < '$buildDate'"

Invoke-Sqlcmd -ServerInstance $destinationSqlServer -Database "DynamicsAx1" -Query $query

#Pass along Version Control Lock table
$query = "INSERT INTO [DynamicsAx1].[dbo].[SYSVERSIONCONTROLMORPHXLOC2542]
SELECT src.*
FROM [$sourceSqlName].[DynamicsAx1].[dbo].[SYSVERSIONCONTROLMORPHXLOC2542] src
LEFT JOIN [$destinationSqlName].[DynamicsAx1].[dbo].[SYSVERSIONCONTROLMORPHXLOC2542] dest
ON src.RECID = dest.RECID
WHERE dest.RECID IS NULL and src.CREATEDDATETIME < '$buildDate'"

Invoke-Sqlcmd -ServerInstance $destinationSqlServer -Database "DynamicsAx1" -Query $query

#Pass along Version Control Revision table
$query = "INSERT INTO [DynamicsAx1].[dbo].[SYSVERSIONCONTROLMORPHXREV2543]
SELECT src.*
FROM [$sourceSqlName].[DynamicsAx1].[dbo].[SYSVERSIONCONTROLMORPHXREV2543] src
LEFT JOIN [$destinationSqlName].[DynamicsAx1].[dbo].[SYSVERSIONCONTROLMORPHXREV2543] dest
ON src.RECID = dest.RECID
WHERE dest.RECID IS NULL and src.CREATEDDATETIME < '$buildDate'"

Invoke-Sqlcmd -ServerInstance $destinationSqlServer -Database "DynamicsAx1" -Query $query

#Update RecID sequences for above tables
foreach ($i in (2541, 2542, 2543))
{
$query = "UPDATE [DynamicsAx1].[dbo].[SYSTEMSEQUENCES]
SET NEXTVAL = (SELECT NEXTVAL FROM [$sourceSqlName].[DynamicsAx1].[dbo].[SYSTEMSEQUENCES] src
WHERE src.TABID = $i)
WHERE TABID = $i"

Invoke-Sqlcmd -ServerInstance $destinationSqlServer -Database "DynamicsAx1" -Query $query
}

Each of the queries is run on the destination SQL server, so the information is ‘pulled’ forward. Additionally, it will only take version notes that were created before the current build. This allows multiple builds to be in the system, without the version information being passed upstream.

The biggest risk with this setup is if you need to roll back Build before a production promotion occurs. If you do not load the same elements in the same order, you run the risk of the RecID on the version control tables getting out of sync.

Start AX Server Process

Now that all the database maintenance has been completed, we start up the AX processes again:

StartAxServers.ps1
1
2
3
start-service -inputobject $(get-service -ComputerName "[AX Load Balancer]" -DisplayName "Dynamics AX Object Server 5.0$*") -WarningAction SilentlyContinue
start-service -inputobject $(get-service -ComputerName "[AOS Server 1]" -DisplayName "Dynamics AX Object Server 5.0$*") -WarningAction SilentlyContinue
start-service -inputobject $(get-service -ComputerName "[AOS Server 2]" -DisplayName "Dynamics AX Object Server 5.0$*") -WarningAction SilentlyContinue

Again, this is a PowerShell script, so we can take advantage of the indefinite wait while each process starts up. You may also notice that we start the processes in the reverse order we shut them down. While this is not necessary for everyone, it is something that should be kept in mind.
Our license allows for 2 concurrent AOS servers, and technically an unlimited number of load balancers (since they do not consume a server license). However, when starting up the load balancer, the process is not yet aware that it is a dedicated load balancer, and consumes a license. During a normal startup this license would normally be released in a few seconds. However, since we deleted the cache/index files earlier, and it is the first server process to start, it will rebuild all those files prior to releasing the license.
The end result of all this is that if we do not wait for the load balancer to finish starting up, the second production server (the third in the list) will not start at all.

Also, this step has a slight configuration change compared to the previous steps. All the previous steps are configured to only execute if the build status is successful. This means that if any step fails, the subsequent steps will not run - a helpful feature, especially when the server processes fails to stop. However, this step is configured as “Always, even if a build stop command was issued.” This allows the servers to always come back online, even if the promotion was a failure or manually stopped.

Synchronize Data Dictionary

This step ensures that the database schema matches what the code says it should. Since the database was restored earlier (for non-production environments), this applies any database changes that have been introduced since the last production promotion.

Backup Production Database (Production only)

This step is only in the Production Promotion configuration. I will explain more about why this step is here in my next post, but for the time being the step is relatively simple: backup the production database to a network location. The backup is then used in all the other processes to restore to a production-like status.

And that’s how we run our promotions. Manually promoting is just a button click away, and the total system downtime is minimized. For non-production promotions, the average time to run (from shutdown to completion of the database sync) is about 40 minutes. For the production promotion, average system downtime is about 30 minutes. The total time to run (including the database backup) is about 2 hours. This gives us a lot of flexibility in scheduling our updates with minimal downtime.

Comment and share

Read the other posts in this series:
Why Create an AX Build Server/Process?
Part 1 - Intro
Part 2 - Build
Part 3 - Flowback
Part 4 - Promotion
Part 5 - Putting it all together
Part 6 - Optimizations
Part 7 - Upgrades

I’m going to skip what really should be my next post in the Automated Builds and Code Deployment series (which should be about how code is promoted from Dev -> Build -> UAT -> Staging -> Production), and instead write about the reverse process, which I will be referring to as flowback.

Basically, since our environments need to be kept up to date with production, for both code and data, we need to have processes in place that allow us to update those development environments after certain conditions. In our case, we have 2 distinct development environments that need to be updated in this way: Build and Dev. All the other environments should be based on one of those two environments (or based on an environment that is based on those environments, etc).

Because we are still working through our own implementation of automated code deployment, we decided to implement the flowback before the promotion, since it would help with our existing manual promotion strategy. Once the promotion architecture is all set up, we can adjust the flowback processes as necessary, which will be fairly minor.

To manage our flowback processes, we are again using TeamCity. We are running TeamCity 8, and taking advantage of a new feature that was not present in version 7: Templates. Templates are a base build configuration, with steps, triggers, conditions, dependencies, parameters and requirements defined. When you create a new configuration based on a template, you are not able to delete anything that is defined in the template, but you can add additional attributes or change some of them. It is important if you want to use templates that not everything can be overridden. If in doubt, assume the template will override any settings on the configuration.

We’ve hooked our flowback template to be based on the same VCS repository that was mentioned in the previous post. This repository holds all the script files necessary to operate every aspect of the project: Build, Promotion and Flowback. We have it organized so each server has its own folder. If the server has both a promotion and a flowback process (Build in this case), it has a Promotion and Flowback folder as well. This structure will become helpful in a moment.

The flowback process itself is fairly simple, with only 4 steps: Shutdown the AX server process, update the server binaries, restore the SQL database, restart the AX server process.

Our production server still has a few operations that are run outside of the managed build process. Because we don’t want to bring the production server offline every night to copy the binaries, we use a tool that takes a Shadow Copy of the files, and moves them on to a central network location. In addition, the production SQL database is backed up to the same location. Our managed flowback process will use these files to restore the environments.

Here is an example of what one of our steps look like:

You will notice the script name is hardcoded into the step (in this case ‘.\StopAxServers.ps1’). This is where the VCS folder structure comes in. In our template, we define a build parameter:

We do not specify a value on the template itself, we simply declare its existence. When a new configuration is created, it will prompt us for the value of this parameter, and the configuration will not run without it. The value is the relative path of the scripts in relation to the VCS root. So, for our Build Flowback, the value will be ‘Build/Flowback’; for Build promotion to UAT it will be ‘Build/Promotion’; for Dev flowback, it will simply be ‘Dev’. Each flowback process has identically named files, with only the script commands changed as needed to reflect the different environments.

Since each flowback process should be identical except for a couple key variables (namely the destination server name), this makes things much easier to manage. If, in the future, we decide that all flowback processes should have another step, we simply add it to the template, ensure the new script file is in the correct directories and it will automatically show up the next time the configuration is run.

Each step in the template calls a single file:

Shutdown AX Server: StopAxServers.ps1
Update AX Source Files: UpdateAxFiles.ps1
Update AX Database: UpdateAxDatabase.bat
Start AX Server: StartAXServers.ps1

Each UpdateAxDatabase.bat file looks like this:

UpdateAxDatabase.bat
1
2
3
4
5
6
7
8
9
10
11
12
13
14
15
16
17
18
19
20
21
22
23
24
25
26
27
28
29
30
31
32
33
34
35
36
37
38
39
40
41
42
@echo off
REM local resources
set sqlServerHost=[Destination SQL Server Name]
set sqlServerCloneScript=Server Clone.sql
REM /local resources

REM remote resources
set rootSourceLocation=[Network Database backup location]
set dbBackupFileName=DBBackup.bak
REM /remote resources

REM calculations
set dbBackupFile=%rootSourceLocation%%dbBackupFileName%
REM /calculations

echo Dropping DB Connections...
osql -E -S %sqlServerHost% -d master -Q "ALTER DATABASE DynamicsAx1 SET SINGLE_USER WITH ROLLBACK IMMEDIATE" -b
IF ERRORLEVEL 1 ECHO ##teamcity[message text='Failed to drop database connections' status='ERROR']

echo Restoring database...
set query=RESTORE DATABASE [DynamicsAx1] FROM DISK = N'%dbBackupFile%' WITH FILE = 1, NOUNLOAD, REPLACE, STATS = 10
osql -E -S %sqlServerHost% -d master -Q "%query%" -b
IF ERRORLEVEL 1 ECHO ##teamcity[message text='Failed to restore database' status='ERROR']

echo Compressing database
osql -E -S %sqlServerHost% -d DynamicsAx1 -Q "ALTER DATABASE [DynamicsAx1] SET RECOVERY SIMPLE" -b
IF ERRORLEVEL 1 ECHO ##teamcity[message text='Failed to set simple recovery mode' status='WARNING']

REM Simple backup recovery
osql -E -S %sqlServerHost% -d DynamicsAx1 -Q "DBCC SHRINKFILE (N'DynamicsAx1_log' , 0, TRUNCATEONLY)" -b
IF ERRORLEVEL 1 ECHO ##teamcity[message text='Failed to truncate database log' status='WARNING']

REM Shrink log file
echo Applying Database Changes...
osql -E -S %sqlServerHost% -d DynamicsAx1 -i "%sqlServerCloneScript%" -b
IF ERRORLEVEL 1 ECHO ##teamcity[message text='Failed to apply database changes' status='ERROR']

REM Execute database change script
osql -E -S %sqlServerHost% -d DynamicsAx1 -Q "ALTER DATABASE DynamicsAX1 SET Multi_user" -b
IF ERRORLEVEL 1 ECHO ##teamcity[message text='Failed to restore database connections' status='ERROR']

REM Enable multi-user in case restore failed

The script is set up to have the items that change (the hostname and file locations) at the top, and use them throughout the rest of the script. Feel free to adjust it as needed. Because of a bug with powershell scripts in TeamCity, it’s difficult to capture any errors that occur. The osql command (with the -b flag) allows us to check the result of the SQL command and issue messages back to TeamCity. Depending on the command, it could fail the build (failing to restore the database will cause an error, but if we can’t shrink the database it’s not a big of a deal so we only issue a warning).

The SQL Clone Script referenced is separate SQL file. The purpose is to fix URLs, user permissions, etc so the server operates correctly. This is a sample of our script (note: This is for AX 2009; this may not work in 2012 because of database schema changes):

SQL Clone Script
1
2
3
4
5
6
7
8
9
10
11
12
13
14
15
16
17
18
19
20
21
22
23
24
25
26
27
28
29
30
31
32
33
34
35
36
37
38
39
40
41
42
43
44
45
46
47
48
49
50
51
52
53
54
55
56
57
58
59
60
61
62
63
64
65
66
67
68
69
70
71
72
73
74
75
76
77
78
/* Old Server Information */
Declare @P_AOS varchar(15)
Declare @P_SQL varchar(15)
Declare @P_SSRS varchar(15)

Set @P_AOS = '{Production AOS Server}'
Set @P_SQL = '{Production SQL Server}'
Set @P_SSRS = '{Production SSRS Server}'

/* New Server Information */
Declare @AOS varchar(15)
Declare @SQL varchar(15)
Declare @SSRS varchar(15)

Set @AOS = '{Development AOS Server}'
Set @SQL = '{Development SQL Server}'
Set @SSRS = '{Development SSRS Server}'


--Remove old server connections ----------------------------------------------------
TRUNCATE TABLE [SYSSERVERCONFIG]
TRUNCATE TABLE [SYSSERVERSESSIONS]

--Update SSRS Setting---------------------------------------------------------------
Update SRSSERVERS Set [SERVERID] = REPLACE(upper([SERVERID]), upper(@P_SSRS), upper(@SSRS))
Where upper([SERVERID]) like '%' + upper(@P_SSRS) + '%'

Update SRSSERVERS Set [SERVERURL] = REPLACE(upper([SERVERURL]), upper(@P_SSRS), upper(@SSRS))
Where upper([SERVERURL]) like '%' + upper(@P_SSRS) + '%'

Update SRSSERVERS Set [REPORTMANAGERURL] = REPLACE(upper([REPORTMANAGERURL]), upper(@P_SSRS), upper(@SSRS))
Where upper([REPORTMANAGERURL]) like '%' + upper(@P_SSRS) + '%'

--Update SQL Settings---------------------------------------------------------------
Update [SYSCLIENTSESSIONS] Set CLIENTCOMPUTER = REPLACE(upper(CLIENTCOMPUTER), upper(@P_SQL), upper(@SQL))
Where upper(CLIENTCOMPUTER) like '%' + upper(@P_SQL) + '%'

Update [SYSLASTVALUE] Set [DESIGNNAME] = REPLACE(upper([DESIGNNAME]), upper(@P_SQL), upper(@SQL))
Where upper([DESIGNNAME]) like '%' + upper(@P_SQL) + '%'

Update SYSUSERLOG Set [COMPUTERNAME] = REPLACE(upper([COMPUTERNAME]), upper(@P_SQL), upper(@SQL))
Where upper([COMPUTERNAME]) like '%' + upper(@P_SQL) + '%'
------------------------------------------------------------------------------------
UPDATE SysSQMSettings Set GlobalGUID = '{00000000-0000-0000-0000-000000000000}'
------------------------------------------------------------------------------------
UPDATE [SYSBCPROXYUSERACCOUNT] SET [SID] = 'S-x-x-xx-xxxxxxxxx-xxxxxxxxx-xxxxxxxxxx-xxxxx', [NETWORKALIAS] = '{Development Business Connector Proxy Account}'
where [networkalias] = '{Production Business Connector Proxy Account}'

------------------------------------------------------------------------------------
-------------------USER AND PLUGIN CHANGES------------------------------------------
------------------------------------------------------------------------------------

--Disable all users
UPDATE USERINFO Set [ENABLE] = 0 WHERE ID != 'admin'

--Re-enable all dev users
UPDATE USERINFO Set [ENABLE] = 1
WHERE ID IN ({User list})
UPDATE USERINFO Set [SID] = 'S-x-x-xx-xxxxxxxxx-xxxxxxxxx-xxxxxxxxxx-xxxxx' WHERE ID = 'admi3'
.
.
.

--Set compiler to level 2
UPDATE USERINFO SET [COMPILERWARNINGLEVEL] = 2 WHERE [COMPILERWARNINGLEVEL] > 2
------------------------------------------------------------------------------------

--Assign new permissions as needed
INSERT INTO USERGROUPLIST ([USERID],[GROUPID],[MODIFIEDDATETIME],[DEL_MODIFIEDTIME],[MODIFIEDBY],[CREATEDDATETIME],[DEL_CREATEDTIME],[CREATEDBY],[RECVERSION],[RECID])
VALUES
('{user}','Admin','2012-01-01 12:00:00.000',0,'-AOS-','2012-01-01 12:00:00.000',0,'-AOS-',1,5637148952)
.
.
.

------------------------------------------------------------------------------------
--UPDATE SYSVERSIONCONTROLPARAMETERS Set [VCSEnabled] = 1 WHERE KEY_ = 0
------------------------------------------------------------------------------------

In addition to modifying user settings and permissions, we also manage things like 3rd party plugins that should be pointed to different environments, and obfuscate certain information that should only be readily available in production. We also have a modification in our system that allows us to change the background of the windows on a company-by-company basis to easily identify which environment/company you are working in. When this script is run, the color is set to Red across all companies (Dev is Purple, Staging is Green, UAT is orange).

When the server is finally started back up, everything is repointed to the development settings, and it now operates independently of production as it should.

Comment and share

Read the other posts in this series:
Why Create an AX Build Server/Process?
Part 1 - Intro
Part 2 - Build
Part 3 - Flowback
Part 4 - Promotion
Part 5 - Putting it all together
Part 6 - Optimizations
Part 7 - Upgrades

In this part of my Automated Build and Code Deployment series, I’ll be going over one of the more critical aspects: the build itself. I’ll outline exactly what happens during the build process, including code examples where necessary. The automation does require some changes to AX to help it run more efficiently.

To help orchestrate every step of the build process, we are using TeamCity, an easy to use continuous integration tool (http://www.jetbrains.com/teamcity/), and a series of short and simple powershell scripts. To help with the process, we keep all the scripts under VCS which is then linked to TeamCity. If any changes occur to the scripts, the changes are applied prior to running any tasks.

The TeamCity Agent responsible for running the tasks is installed on the build server, running under a dedicated user that has administrative rights. The user is also granted administrative rights in AX (Build only) so it can run the Sync and Compile commands.

To help, here’s an overview on how TeamCity can help to accomplish the goals as ideals I set in my previous post:

All the processes except for one are automated. In this case, the Build Trigger is a scheduled item, as is the update from Staging to Production and UAT to Staging. However, the artifacts used on UAT and Staging are different depending on the conditions of the build. UAT will use the artifacts from the last successful build (and will process as soon as the Build is completed), while staging will use the artifacts from the most recent pinned build. Because pinning a build is a manual process, and the ability can be restricted to certain users, it makes the ideal condition to determine the code that gets pushed to Staging. However, in TeamCity artifacts from pinned builds are kept indefinitely regardless of the cleanup plan you specify. We are planning on only keeping 3-4 builds pinned at any given time, so we can manage the space artifacts take up and still have enough history to rollback if necessary.

The actual AX build consists of 3 steps: Synchronize the Data Dictionary, compile the code, and figure out what happened. Our build process will address all three of these steps. If any additional requirements come up, TeamCity makes it easy to add new steps so we can make sure those happen as well. Because the scripts are wrapped in a VCS, it’s easy to make script modifications and to track when a change happened.

AX already has built-in command line commands to help handle the Data Dictionary synchronization and the system compile. Both commands will automatically close AX when the process is complete. In addition, the system compile command automatically takes the compiler output and saves it to a file, for later analysis. However, the normal output file is an HTML file with embedded XML output from the tmpCompilerOutput table, which holds all the information you normally see on the compiler. Because the HTML file does not render properly on modern browsers (it only works on Internet Explorer 9 and earlier, and even then does not do all it should if you examine the source), I have opted to change the SysCompilerOutput class so it outputs directly to a .xml file with only the pure XML. This also makes it easier to parse the results. If you want to do the same, here’s how:

SysCompilerOutput.classDeclaration
1
2
3
4
5
//Change
#define.compileAllFileName('\\AxCompileAll.html')

//To
#define.compileAllFileName('\\AxCompileAll.xml')
SysCompilerOutput.xmlExport
1
2
3
4
5
6
7
8
//Comment out or remove the following lines:

file.write(#htmlStart);
file.write(#compileXmlStart + '\n');
.
.
.
file.write(#htmlEnd);

If you would rather keep the HTML file and use it instead, you will need to make some changes to the script to account for the extra XML nodes. In addition, you will likely need to account for the XML header information (<?xml version="1.0" encoding="UTF-8"?>), as it may lead to parsing errors.

The actual build configuration in TeamCity is rather simple, only 3 steps:

SynchronizeAx.bat:

SynchronizeAx.bat
1
ax32.exe -startupcmd=synchronize

CompileAx.bat:

CompileAx.bat
1
ax32.exe -startupcmd=compileall_+

The Parse AX Compiler Results task is little stranger, but only because TeamCity currently has a bug that causes it not to use the correct return value from PowerShell scripts.

The script source allows the script to run, and returns the error code from that script if there is any.

ParseCompilerResults.ps1 looks like this:

ParseCompilerResults.ps1
1
2
3
4
5
6
7
8
9
10
11
12
13
14
15
16
17
18
19
20
21
22
23
24
25
26
27
28
29
30
31
32
33
34
35
36
37
38
39
40
41
42
43
44
45
46
47
48
49
50
51
52
53
54
trap
{
# On any thrown error, return with a non-zero exit code
exit 1
}

if ($env:TEAMCITY_VERSION) {
# When PowerShell is started through TeamCity's Command Runner, the standard
# output will be wrapped at column 80 (a default). This has a negative impact
# on service messages, as TeamCity quite naturally fails parsing a wrapped
# message. The solution is to set a new, much wider output width. It will
# only be set if TEAMCITY_VERSION exists, i.e., if started by TeamCity.
$host.UI.RawUI.BufferSize = New-Object System.Management.Automation.Host.Size(8192,50)
}

[xml]$xml = (Get-Content "C:\Users\Public\Microsoft\Dynamics Ax\Log\AxCompileAll.xml")

$ns = @{ Table = "urn:www.microsoft.com/Formats/Table" }

$errorNodes = Select-Xml -XPath "/AxaptaCompilerOutput/Table:Record[Table:Field[@name='SysCompilerSeverity'] = 0]" -Xml $xml -Namespace $ns
$warningNodes = Select-Xml -XPath "/AxaptaCompilerOutput/Table:Record[Table:Field[@name='SysCompilerSeverity'] > 0 and Table:Field[@name='SysCompilerSeverity'] < 255]" -Xml $xml -Namespace $ns
$todoNodes = Select-Xml -XPath "/AxaptaCompilerOutput/Table:Record[Table:Field[@name='SysCompilerSeverity'] = 255]" -Xml $xml -Namespace $ns

$success = $true

foreach ($node in $errorNodes)
{
$success = $false
$nodePath = ($node.Node.Field | ? { $_.name -eq "TreeNodePath" }).'#text'
$message = ($node.Node.Field | ? { $_.name -eq "SysCompileErrorMessage" }).'#text'

write-host "##teamcity[message text='${nodePath}: $message' status='ERROR']"
}

foreach ($node in $warningNodes)
{
$nodePath = ($node.Node.Field | ? { $_.name -eq "TreeNodePath" }).'#text'
$message = ($node.Node.Field | ? { $_.name -eq "SysCompileErrorMessage" }).'#text'

write-host "##teamcity[message text='${nodePath}: $message' status='WARNING']"
}

foreach ($node in $todoNodes)
{
$nodePath = ($node.Node.Field | ? { $_.name -eq "TreeNodePath" }).'#text'
$message = ($node.Node.Field | ? { $_.name -eq "SysCompileErrorMessage" }).'#text'

write-host "${nodePath}: $message"
}

if ($success -eq $false)
{
throw $_
}

The top of the script (before [xml]$xml = Get-Content…) sets a generic error handler to return a non-zero error-code when it fails, and sets the TeamCity Runner to a wider screen size. The screen size is necessary because otherwise there is a good change the ###teamcity messages will not be parsed correctly because they are too long. You can tweak the script as necessary (by adding $success = $false to any of the other foreach blocks) to raise your quality bar as you see fit.

It would also be wise to adjust the Build Failure conditions to include “an error message is logged by a build runner” and “build process exit code is not zero”. You can define additional failure conditions as desired.

Finally, we have artifact paths set as follows:

1
2
3
4
5
C:\Program Files\Microsoft Dynamics AX\50\Application\Appl\DynamicsAx1\*.ald => BuildFiles.zip
C:\Program Files\Microsoft Dynamics AX\50\Application\Appl\DynamicsAx1\*.add => BuildFiles.zip
C:\Program Files\Microsoft Dynamics AX\50\Application\Appl\DynamicsAx1\*.ahd => BuildFiles.zip
C:\Program Files\Microsoft Dynamics AX\50\Application\Appl\DynamicsAx1\*.aod => BuildFiles.zip
C:\Program Files\Microsoft Dynamics AX\50\Application\Appl\DynamicsAx1\*.khd => BuildFiles.zip

This allows all the data files to packed up into a single zip file, which is then uploaded to TeamCity for later use. Interestingly enough, even though these are binary files (except the label files, which are plaintext) we are still getting a 10% compression ratio, meaning our 3.5GB of files are compressed to 350MB.

That’s all there is to it! Once it’s set up, build will happen automatically. Combined with some tools that hook into TeamCity, like VisuWall, you can easily identify where any issues may be:

As you can see, the AX Build process is failing. The build log for the build contains the details of what failed. In our case, some classes contain a syntax error that need to be fixed. In our process, this would not trigger an update of UAT until it was fixed.

This screen is on display for everyone to see in our IT area, and updates in realtime. When we fix those classes, the block will turn green like the rest of the board. Plus, the AX process displays the same way the rest of our projects do, making it an easy way to know what’s happening in development.

Comment and share

Read the other posts in this series:
Why Create an AX Build Server/Process?
Part 1 - Intro
Part 2 - Build
Part 3 - Flowback
Part 4 - Promotion
Part 5 - Putting it all together
Part 6 - Optimizations
Part 7 - Upgrades

As I’ve mentioned a couple times, I am pushing to create a system within our AX implementation which will automatically deploy code changes through to our production environment. Some parts of this system (like to our Production server) will be automatically deployed, while others (like to the Staging server) will require a manual approval before deployment.

In this post, I plan on outlining exactly how I will approach this kind of system, some of the considerations and reasoning behind some of my ideas. I am only going to cover this from a relatively high level; in a future post, I will give some actual code examples on how to accomplish the tasks outlined here.

First, our overall layout would look something like this:

The first thing you can see is that the development is cyclical, which is best practice in any environment. Once the code is promoted to production, the development systems are updated to match, ensuring future development does not overwrite recent modifications. For the purposes of this post, we will not discuss the data flow.

As for the actual makeup of the system, I am using a total of 5 servers. More stringent requirements may insist on more (I’ve seen as many as 8), and you can do it with as few as 4 by eliminating the dedicated Build server and combining the functionality with the User Acceptance Testing, but it would require a little more management to ensure procedures happen in the correct order. A 5 server system eliminates many of those problems with minimal resource requirements.

I’ve also included how code is transferred between each of the environments.

XPO

Transfer files by exporting the raw XPO from the source system, and importing it into the destination system. IDs are generally not exported or imported. This method should only be used prior to the build taking place. A database sync and full compilation are necessary for all the changes to take effect.

Automatic Layers

The fully compiled set of layer and label files are moved automatically from the source system to the destination system. This can take place on a schedule or when triggered by a system event. Unless a temporary storage location is used, both environments must be taken offline. When the system is brought online, only a database sync is necessary.

Manual Layers

The fully compiled set of layer and label files are automatically moved from the source system to the destination system. The transfer only occurs on a specific, user-initiated event. Unless a temporary storage location is used, both environments must be taken offline. When the system is brought online, only a database sync is necessary.


As you can see, the entire system is not completely automated. At key points there is human interaction required. This can be something as simple as running a batch file, which triggers the code push to the next environment. However, depending on your programming skills and specific business requirements this can be any human-based event. In either case, the actual transfer of code (including XPOs) should be completely automated whenever possible.

Environments and Promotion

Since each step along the development process has its own considerations, I’ll approach each stage and how code in that stage is pushed to the next.

Development → Build

This is probably the most critical step in the entire process, and the one that incurs the most risk. Transfers from Development to Build should happen via XPO files, ideally a project containing all the necessary elements. This allows projects to be pushed through separately, even if the development is happening concurrently. Some care needs to be taken if separate projects touch the same elements. Since the transfers occur in a plaintext format, it is possible for changes to the code to be made, if you know what you’re doing. Ideally the XPOs would be loaded into the Build server during the day as they complete. It is possible to create an automated XPO import system to handle this. The developer would export the XPOs to a specific folder (like a network share), which the Build server would process out of. However, the automated portion of this can easily be replaced with a non-developer, who would periodically import the XPOs in manually. If no such control is necessary, the developer can import into Build directly.

Build → User Acceptance Testing

I am assuming a nightly build. During the build process, the Data Dictionary is synced and the AOT is fully compiled. Any errors are thrown into a log file on the server, and examined. If errors occurred during the build, it is considered failed. It is important to note that “errors” should refer to your desired build quality. The log should report on all critical build errors (missing references, undeclared variables, unterminated statements), warnings (not calling an expected super(), not returning a value, precision loss), and best practice deviations. If it up to your organization to determine what is considered acceptable in a build.

A successful build will trigger an immediate shutdown of the build server, and the Layer and Label files sent to the User Acceptance Testing environment. The recommendation is to move the files to a temporary storage location, so the Build server can be brought online again right away. The Test environment would then shut down and copy those files, overwriting the existing set. The Test update would happen on a schedule off-hours, so not as to disturb any testing that might be done during the day. Once the server it brought back online, a Data Dictionary sync (plus restart of any services like IIS) is all that remains.

User Acceptance Testing → Staging

User Acceptance is probably the most important but longest running part of the development process. As the name implies, this is where the code undergoes testing by the user (preferably the one who originally made the request, but this can vary depending on the nature of the request). Only when the user has given their approval should the code be promoted into the Staging environment. If you have multiple projects in development concurrently with different approvers, there are a few issues that should be addressed. Since the goal is to move all the code through as layer files, and there is no way of separating specific elements from those files, it can be a pain when approval for one project come in before others, or when a project needs to be streamlined through the process ahead of other projects that have been in development longer. One thing to keep in mind is that all elements in the User Acceptance environment should be accepted or declined as one. If a single element fails testing, the entire environment should fail. Ideally, only a single project should be pushed through User Acceptance at a time. Since this would generally be a rare occurrence, it would be recommended that when it comes time to push accepted projects to staging, the entire environment is re-built without the unapproved projects, and when completed the User Acceptance environment is promoted to Staging.

Because the amount of time it would take to get approval will vary, the push to Staging should not be set on a schedule.

Staging → Production

The Staging environment is considered the gateway to production. Because oftentimes the downtime available to an AX administrator is limited, it is imperative to take advantage of any downtime that is available. The Staging environment allows code deployments to be scheduled during downtime without any Administrative interactions. Since we have pre-compiled all the code to be deployed, we are eliminating the time needed for Production to compile the incoming code. Since all the errors should have been addressed during the Build process, we do not need to have a person present for the promotion. All that is necessary is a Data Dictionary sync and a restart of any AX-dependent services.

Other Notes

To preserve previous updates, once Staging has been deployed to Production, the Build server should be automatically updated to match Production. This means any projects not yet approved would need to be re-imported every development cycle. To prevent too many conflicts, the Development environment should also be updated to match Production. However, this can be a manually triggered process (ideally by the devs themselves) to make sure any active development projects aren’t lost. Both of these updates are identified by the dotted lines.

To keep the continuity with multiple projects in development, the Build server should ONLY be updated immediately after Staging is deployed to Production, and all still-in-process projects should be re-imported to the Build server as soon as possible. If you do automate the XPO transfer to the Build environment, this becomes much easier to handle.


I hope that this post can help you to automate code production within your own AX environment. I know there are a lot of points left out, but I do hope to address those points in future posts. If you have any questions regarding any point, please let me know below.

Comment and share

Read the other posts in this series:
Why Create an AX Build Server/Process?
Part 1 - Intro
Part 2 - Build
Part 3 - Flowback
Part 4 - Promotion
Part 5 - Putting it all together
Part 6 - Optimizations
Part 7 - Upgrades

This post is a precursor to another post I’m working on, but the information in it is too unique and involved to just add to that post. Instead, I’m putting this in its own post so it’s easier to reference.

In short, this is to answer one question I have, until recently, been struggling with: Why should an AX development and the deployment process consist of a build server?

Unlike most programming structures, the use of a build server or build process is not as intuitive for AX. However, after attending Summit this year, I’m beginning to understand that while it may not reach it’s full potential when there is a small development team, it becomes incredibly helpful for larger teams. This doesn’t mean you shouldn’t use one in a small team, but with one or two developers it creates more overhead than it would for a large team.

A lot of the considerations revolve around standard development practices, and what the community has established as Best Practices. If you already have a development infrastructure in place (separate development, test, and pre-production environments), this can also be very easy to implement.

Originally, our primary way of transferring code between all environments was done via XPO files. There were some issues with this, mostly streaming from having multiple AOS instances, but we were able to overcome that by scheduling our code updates to work with an AOS restart schedule. Since we are publically traded, this also helped separate those that develop (me) from those who administer the production environment (my boss).

Over the course of time, I began to learn some of the Best Practices used in an AX development environment - multiple environments dedicated to specific functions (Dev, UAT, pre-production), as well as effective code management using the binary .aod files.

However, everything really came together at Summit, when I learned that as Best Practice you should do a full system compilation on the destination system. That is, unless you move ALL the layer files from a system that has already been through a full compile. As long as no further code changes are made, you can use those files through the entire deployment process, meaning (assuming you follow Best Practice) you save time on every step of the process.

Comment and share

AX Summit 2013

So, I’m in Tampa at the 2013 AXUG Summit. Even after just the first day I’ve gotten a lot of good information about how to set up a couple of things I’ve had my eye on with regards to our deployment and even had a few ideas on new posts.

I’ve also met several truly awesome people who have some incredible tales for what to do and what not to do. And the biggest surprise is that I am giving others advice based on my own experience – something that given how long I (haven’t) been doing this for encourages me.

Once I get back I’m sure I’ll be summarizing my experiences and expanding with more details. Meanwhile, talking with others who are in the same situation as I am for certain things gives me ideas on how I can make the AX community a better place. To that end, I have decided that I will eventually publish the security tools I have written (both for an administrator and as an auditor contact). Before I do so I will need to clean them up and make sure everything is in order, including the accompanying X++ code. Since it was originally written just for my own internal purposes, it’s not as good as it could be. I’ll be working on that in my “free time”, and hopefully will have something publishable by the end of the year.

In addition, sitting in a session about code deployment and maintenance has me inspired to implement an automated code deployment system which follows best practices such as deployment of layer files and version control (in this case using MorphX VC). I know where I want to go with this, but I’m not entirely sure how to go about the actual implementation. I will also be working on this in my “free time”, but we’ll see when I finally get a nice polished system in place. In the meantime, I’ll likely post an occasional update when I find something new or interesting.

Comment and share

We have recently seen an issue with the Export to Excel feature of AX 2009, where a stray double quotation mark in the grid will cause all subsequent fields to be offset. Instead of getting nicely formatted rows and columns, we had a few well-formatted rows, and some other rows that weren’t so nicely formatted. This is also shown in one or two other places around there internet (such as http://community.dynamics.com/ax/f/33/t/102643.aspx), but as much as I looked I could not find a solution. We had looked at this problem earlier, as many of our part number include double quotes to represent inches. Previously, we modified the itemName method on the InventTable to replace double quotes with single quotes, as that would not break Excel and was an easy fix. However, we recently discovered that many other user fields were starting to have double quotes in them, and we needed a way to address all of them.

Taking a lead from the MSDN post How does the Export to Excel feature work under the hood, I looked at the SysGridExportToExcel class, specifically the performPushAndFormatting method. I also began to monitor the Windows clipboard, since as that posts explains, the Export to Excel feature relies heavily on the clipboard.

I figured there are three ways I can attack this issue:

  • Create an edit method for every field that would hold a double quotation mark, and reference that method instead of directly referencing the field on the form. This would cause the form filter to not work properly, plus the thought of doing this for every field seemed daunting.
  • Modify the system so that when the Export to Excel process begins (before the clipboard is populated) all the incoming fields have their double quotes replaced to two single quotes. This is the ideal solution, since there would not be any reprocessing costs like there would be later in the process (after the clipboard has been populated)
  • Modify the system so that after the clipboard is populated but before the information is pasted into Excel, all double quotes are replaced to single quotes. Looking at the information that was being sent to the clipboard showed that the information was formatted as Tab separated values, with most test field surrounded by double quotes, which would need to be preserved.

Since the first option would be a last resort, I began to look into the second option: modify the system to change how it generates the information to be sent to the clipboard. However, even searching online I could not find where the system did this. The only clue I had was the stack trace after hitting a breakpoint early in the performPushAndFormatting method, which seems to indicate it was built into the FormRun base class. Because it is a system base class, I cannot modify it (though it would be the appropriate place to do so). My only other option would be to create my own class that inherits from FormRun, override the Task to build in my own functionality, and proceed to update every form in the system to inherit from this new class. However, since I have no idea what is actually happening in this method AND I would have to do it on every form, this also seemed like a dead end.

The last option, to modify the clipboard data after it has already been generated seemed to be my only option. I discovered the TextBuffer class in AX has a handy fromClipboard and toClipboard method, so I would use that.

Within the performPushAndFormatting method, before any of the Excel work begins, I added the following code:

SysGridExportToExcel.performPushAndFormatting
1
2
3
4
5
6
7
8
9
10
11
12
13
14
TextBuffer buffer = new TextBuffer();
System.Text.RegularExpressions.Regex regex;
str cleanedText;
;

if (buffer.fromClipboard())
{
regex = new System.Text.RegularExpressions.Regex("(?<=[^\\t\\r\\n])\"(?=[^\\t\\r\\n])");

cleanedText = regex.Replace(buffer.getText(), "\"\"");

buffer.setText(cleanedText);
buffer.toClipboard();
}

This replaces all double quotes that are inside the field with two double quotes, which Excel interprets as an escaped double quote. String type fields, when copied from the clipboard, are surrounded by double quotes; the regular expression above excludes those and replaces everything else.

We attempted several ways of accomplishing this goal, from using a series of strReplace commands, to manually parsing the clipboard string character by character, but both of these options were slow when dealing with a large export set.

Comment and share

James McCollum

author.bio


author.job