We have recently been able to really dive in to the AX AIF Webservices, and like most things the road was bumpy and filled with potholes. This isn’t to say that webservices had a lot of problems. In fact, using webservices was certainly beneficial since much of the work has already been done. However, there were some things we had to do to make sure evrything was working the way we want it to.
One of the biggest things that we ran into was making system fields, such as modifiedDateTime, modifiedBy, createdDateTime and createdBy, available for consumption by subscribers of the webservice. These fields, while available for use within AX and thus also available via the Business Connector, are not natively generated and added to the webservice classes.
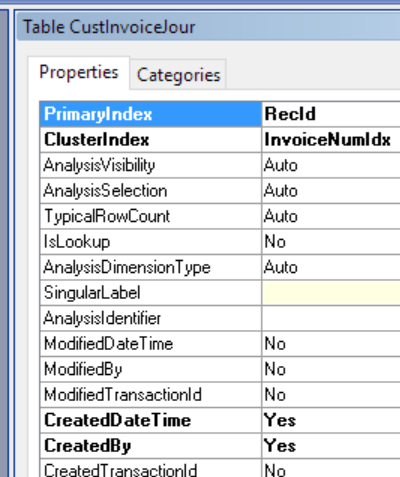
In our case, we wanted to make sure we had the createdDateTime field available in the InvoiceService. The examples I will use will focus around this use case, but they should be transferable to any other similar case.
First, we need to make sure the table actually has the field enabled. On the table properties, simply make sure the createdDateTime property is set to “Yes”:
If this property is not set, change it and syncronize the table. You may also want to run the AIF “Update Document Service” process, but that is not strictly mandatory.
From there, we need to modify the appropriate AIF class to be able to read from the field. The class name we are looking for is named Ax[TableName]; since we are focusing on the CustInvoiceJour table, the class will be AxCustInvoiceJour.
Within this class, we will need to create a method that matches the format parm[FieldName]. Again, as we are trying to bring the createdDateTime field forward, the method will be parmCreatedDateTime. The method should be similar to other parm-type methods:
1
2
3
4
5
6
public [DataType] parm[FieldName]([DataType] _[FieldName] = [DataTypeDefault])
{
    [Value] = _[FieldName];

    return [Value];
}
In out case, this is our new method:
1
2
3
4
public UtcDateTime parmCreatedDateTime(UtcDateTime _createdDateTime = DateTimeUtil::minValue())
{
    return custInvoiceJour.createdDateTime;
}
You will notice that we left the assignment line of the normal method off our implementation. This is because the system fields are always readonly. This change allows someone to specify a new createdDateTime, but since the parameter is ignored, nothing will actually happen.
Finally, the last step is to “publish” the changes. This is done by opening the AIF Services form (found at Basic / Setup / Application Integration Framework / Services) and click the ‘Refresh’ button and then click the ‘Generate’ button. This will regenerate the WDSL files for the service, which can then be updated wherever the service is used.
I posted a while ago about how we modified the Export to Excel function to clean up some of our data on export, so Excel interprets it correctly. The problem addressed in that post is the fact that AX does not properly escape data (particularly double quotes) prior to sending it to Excel.
The solution in question basically intercepts the dataset generated by AX prior to sending it to Excel, runs it through a regex that replaces problem characters (in this case, double quotes) with a properly-escaped version (two double quotes). and then proceed to send the now-escaped data to Excel as usual.
This system works fine except for one situation: exceptionally large data sets take an enormous amount of memory to process, and tend to throw an OutOfMemoryException. In our situation, we tend to run into this with exports of unfiltered Item Details and broadly-filtered Production Orders. Since we need this data more often than one would think (especially the Item Details), we end up going into one of our updated test environments, disable the modification, and export the data from there. This is obviously cumbersome not only for our users, but also for our administrators who need to do the actual export.
Additionally, the modification did not address any other issues that tend to appear when dealing with Excel from AX (Note these issues aren’t directly tied to the Export to Excel function). In particular, we have come across some examples where newline characters and tab stops are added into various non-memo text boxes, like the Item Number and Item Description fields. If a report is ran which is then opened with Excel, these tab stops and newlines are preserved, throwing off the alignment of reports (in one case, we found an item description with 80 newline characters in front of it, pushing down the entire report 80 lines before any more data was displayed). Because these characters are non-printing, nobody notices them until reports that contain them are ran and someone notices the gaps. Even once they’re identified, most users do not know how to fix them because they are non-printing characters.
So, to help combat these issues, we decided to implement a system that would sanitize input as it is being entered. Because each value would be checked as it was entered, we no longer need to worry about the massive memory requirements. The system automatically removes the characters or changes them to more noticeable characters, like spaces, depending on where in the string they fall. We’ve also created it to be applied at a full table level, making it easy to apply to the places that need the most help, and being effective without any changes if a new field is added. Because some fields should be allowed to have these characters, we also added a way to exclude specific fields from being processed without compromising the functionality on the rest of the table.
while (listEnum.moveNext()) { seekStr = conpeek(listEnum.current(), 1); inRepStr = conpeek(listEnum.current(), 3); if (strFind(retVal, seekStr, 1, strLen(retVal)) > 0) { retVal = this.beginTrim(retVal, listEnum.current()); //Trim (remove) the current character from the beginning of the string retVal = this.endTrim (retVal, listEnum.current()); //Trim (remove) the current character from the end of the string retVal = strReplace(retVal, seekStr, inRepStr); //Replace any other occurences of the string } }
a = substr(input, strlen(input) - len, len); b = strRep(seekStr, len / inc);
while (substr(input, strlen(input) - len + 1, len) == strRep(seekStr, len / inc)) { len += inc; } len -= inc; return strfmt("%1%2", substr(input, 1, strlen(input) - len), strRep(repStr, len / inc)); }
protected List excludedCharacters(tableId _tableId) { DictTable dictTable = new DictTable(_tableId); List excludedCharacters; ;
if (tableHasStaticMethod(dictTable, identifierStr("SanitizeCharacters"))) { excludedCharacters = dictTable.callStatic("SanitizeCharacters"); return excludedCharacters; }
excludedCharacters = new List(Types::Container);
//Container mappings are as follows: //[0] = Character(s) to replace //[1] = Replacement value if character(s) are found at the beginning or end of the string //[2] = Replacement value if character(s) are not at the beginning or end of the string excludedCharacters.addEnd(["\r\n", "" , " " ]); excludedCharacters.addEnd(["\n\r", "" , " " ]); excludedCharacters.addEnd(["\n" , "" , " " ]); excludedCharacters.addEnd(["\r" , "" , " " ]); excludedCharacters.addEnd(["\t" , "" , " " ]); excludedCharacters.addEnd(["\"" , "\"", "''"]);
return excludedCharacters; }
boolean isExcludedField(tableId _tableId, fieldId _fieldId) { DictTable dictTable = new DictTable(_tableId); Set excludedFields; ;
if (!tableHasStaticMethod(dictTable, identifierStr("ExcludeSanitizeFields"))) returnfalse; excludedFields = dictTable.callStatic("ExcludeSanitizeFields");
if (excludedFields.in(_fieldId)) { returntrue; }
returnfalse; }
The main entry point is the static method sanitize, which takes a table record and a field number, and gives back a table record. The function will only clean one field at a time, because that is how the function we modify on the table side will also behave. Defined within the class are a list of excluded characters, which can be found in the excludedCharacters method. The characters can be overridden by adding a static SanitizeCharacters method directly on the table. Additionally, you can exclude specific table fields by adding a static ExcludeSanitizeFields method on the table. Note if you specify a SanitizeCharacters method, it will completely overwrite the defaults (newline/linefeed, linefeed/newline, newline, linefeed, tab and quotation mark).
1
2
3
4
5
6
7
8
9
10
publicstatic Set ExcludeSanitizeFields() { Set tempSet = new Set(Types::Integer); ; tempSet.add(fieldNum(InventTable, ItemNotes)); tempSet.add(fieldNum(InventTable, SpecificProductionNotes)); return tempSet; }
//Container mappings are as follows: //[0] = Character(s) to replace //[1] = Replacement value if character(s) are found at the beginning or end of the string //[2] = Replacement value if character(s) are not at the beginning or end of the string excludedCharacters.addEnd(["\r\n", "" , " " ]); excludedCharacters.addEnd(["\n\r", "" , " " ]); excludedCharacters.addEnd(["\n" , "" , " " ]); excludedCharacters.addEnd(["\r" , "" , " " ]);
return excludedCharacters; }
The excluded character list is actually a list of containers, each with 3 elements: the character(s) to look for, the character(s) to replace the first value with if they are found at the beginning or end of the string, and the character(s) to replace the first value with if they are found anywhere else in the string. This was because we wanted to define different behavior depending on where the strings were found - in some cases, we wanted to just remove them, and in others we wanted to replace them with spaces. The excluded fields are a list of integers, representing the field numbers for that table.
Finally, here is how we link this functionality into our table. Our code is triggered from the modifiedField method of the table:
this = SysInputSanitation::sanitize(this, _fieldId);
switch (fieldExt2Id(_fieldId)) { . . . } }
Because we set up the main entry point as a static method, we do not need to worry about instantiating the class etc. This does cause some overhead, as the class will instantiate itself for each request (that is, for every modified field), but we can reasonably rely on the Garbage Collector to help keep that in check. The table record effectively passes through the class, coming out scrubbed on the other end. From there, we can proceed to other field-specific changes outlined in the switch statement, treating the scrubbed data as if that is what the user entered.
The change the values are virtually invisible to the user, especially as far as the non-printing characters are concerned.
I need to point out the reason we include "\r\n" as a separate entry from "\r" and "\n" in the excluded characters list. Normally, these two characters do come in pairs. If we left the list to just read "\r" and "\n" individually, only one of the pair on each end of the string would be trimmed, while the rest would be treated as inside the string and replaced with a different character. For example, running the value "\r\n\r\n\r\n\r\nValue\r\n\r\n\r\n\r\n" would result in the value of " Value " (with 7 spaces on each side), instead of "Value" (with no spaces) as we would expect.
Finally, now that future inputs are cleaned up, all that is left is cleaning up historical data. You can easily wrap this into a one-time job that would clean some (or all) fields in a table, depending on how you write it. Once that is completed, the original modification can be backed out and the original functionality of the Export to Excel can be restored.
If you’ve visited my blog before, you may noticed things seem a little different. I’ve recently changed blogging engines, and I want to take a break from my normal AX writings to address it.
First, I want to address the reason why. The new engine is a static blog generator called Hexo. The reason I switched is not the usual reason people switch to a static blog: most people switch to increase performance on their site. While I’m not going to turn away any performance increases, that was not my motivation. I simply wanted to get away from using a database.
I’m sure if you are interested in learning more about static blogs and what benefits they may offer, there are plenty of write-ups elsewhere. However, there are few things (especially related to Hexo) that don’t seem to be covered anywhere I was able to find. I’ll get to that shortly, but first I want to cover some of the concepts about Hexo itself.
Standard Workflow
The normal workflow with Hexo is relatively simple:
Create a new Markdown file with the post content and relevant metadata.
Run hexo generate to get the HTML files.
Deploy the recently generated files to the web host.
There are some additionally optional steps to help with the process.
Version Control
With a static generator, it’s often encouraged to have all the relevant information in Version Control. Hexo supports this by having a Node.js backend and taking advantage of Nuget Package Manager (NPM). Once everything is committed to a repository, it’s easy to get set up on another machine - just run npm install, which downloads all the necessary packages.
Deployment
Once you have the hexo packages, and you have your posts ready, you can run hexo deploy and have the generated files to a Git repository, or any other source you have identified in the hexo configuration. Alternatively, you can set up a second repository (linked to the output folder, Public), and after generation just commit and push that second repository. Note that the hexo deploy command requires Git.
Microsoft Azure
Microsoft Azure is an awesome utility for hosting websites. One of the nice features Azure boasts for websites is continuous deployment. You can hook up the website to a version control repository, and when a change is detected it is automatically deployed. The only thing to keep in mind is that this will deploy the root of the repository. I’ll go into more details on this further down.
I like having the Version Control to track the changes over time. Considering the settings available via the engine (which are also tracked in a text file), it also makes it easy to change the settings and review how things changed over time. However, I found the deployment to be a little lacking for my workflow.
Ideally, I would have a single repository that contains all the information relevant (the posts, the configuration, and resources like images), and when I commit a change to that repository, the necessary files are generated and deployed into the website.
Hexo isn’t completely conducive to this type of workflow, so some accommodations will need to be made. However, I have been able to come up with a solution that effectively has the workflow I want.
Getting the deployment to work with only a single repository is difficult. I can use Azure’s Continuous Deployment feature, but because it will deploy everything in the root of the repository, and hexo puts the generated files (to be deployed) into the /Public/ subfolder, this won’t work as intended.
In the end, I decided to again turn to TeamCity. I did attempt to use a couple other tools, such as Visual Studio Team Services, but I wasn’t able to get them work correctly. I have to use a second repository to contain all the published files, but I’ve been able to hide it behind TeamCity so I don’t have to deal with it. This ultimately allows some extra flexibility in my workflow by being able to decouple the generation of the content from the deployment, but at a cost of having more points of failure and greater setup complexity. Additionally, I was able to use Mercurial as my version control system, which I’m more familiar and comfortable with compared to Git.
Setup
Preliminary
To make sure everything would work the way I envisioned it, I had to do a little bit of setup to my TeamCity server. First, I had to install npm. Since Git has npm bundled with it, I opted to just install Git. This would also allow me to run Git command lines if necessary. Once npm was installed, I also installed the hexo-cli package globally, so I could run the necessary hexo commands.
Once that was finished, I created a second version control repository and cloned it to a folder on the server. I had to make sure the repository had a proper commit name and credentials in the /.hg/hgrc folder, since the TeamCity agent runs under a separate login on the server.
TeamCity Steps
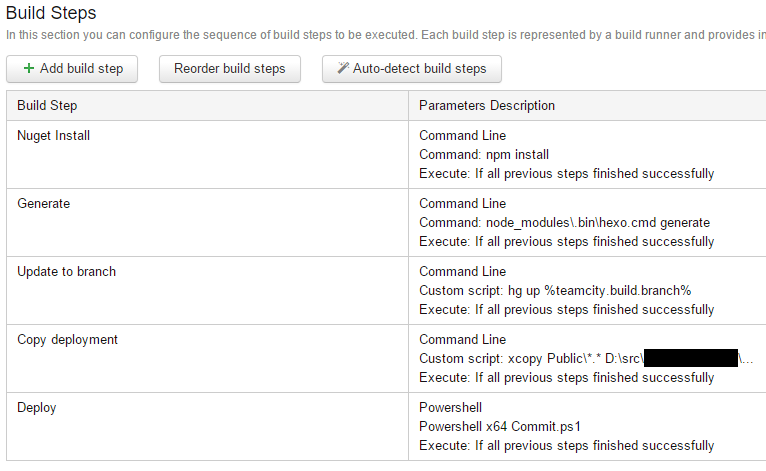
The final build configuration is five steps:
As you can see, most of the steps are simple command lines that are explicitly spelled out in the configuration itself. These could be extracted to files, but they’re very simple and not really going to change.
Step 1: NPM Install
The configuration is set to automatically clean the checkout directory prior to downloading the repository contents. This allows the safety of not accidentally publishing orphaned or corrupted files. Because this also clears the local npm packages, the first step is to reinstall them.
Step 2: Hexo Generate
With the npm packages in place, we run the hexo command (in this case, hexo is not part of the local PATH, so I manually point to it in the node_modules\.bin\ folder) to generate all the files to be deployed.
Step 3: Update Mercurial branch
Before I copy the generated files to the version control directory for deployment, I need to make sure I am in the correct branch. In my case, I have two branches: default and Test. When I make a commit to the master repository, I want to make sure the artifacts are committed to the same branch in the deployment repository. I can use the %teamcity.build.branch% variable to identify which branch of the master repository is currently being built.
Step 4: Copy deployment files
Now I need to transfer the generated files into the local repository I created earlier. A simple xcopy Public\*.* [destination] /s /y will copy all the files, overwriting where necessary, into the publish directory.
Step 5: Deploy
All that’s left is to commit and push the changes. Because I use the current branch in the commit message, I opted to extract the process to a PowerShell file which is stored in the master repository:
This can be a Command Line and hard-coded directly in the build step, depending on what you need.
Step 6: Profit
Once the changes are pushed into the deployment repository, the TeamCity process is done, and other automated processes kick in. I have a couple Azure Websites set up which monitory for changes in a specific branch of the deployment repository. When it detects changes, the site is automatically updated, and the content is available for all to enjoy.
Finally, I wanted to touch on one thing that I consider a shortfall of static blogging that this system actually helps to address: future dating.
I normally have 2-3 posts in progress at any given time, which are generally scheduled to be published sometime in the future. When you have a database-backed engine, this is trivial to implement: when a request is made, simply check the publish timestamp with the current time, and either display or don’t display the content. Because a static content engine, by definition, is generated prior to the request being made, there’s no good way to future-date posts.
With this system in place, I can add a trigger that causes the content to be regenerated every day (or more often), and when new content is available have it automatically deployed to the site.
I hope this helps anyone who is interested in having a Hexo (or other static content) blog deployed automatically. I know there are other systems which have workflows that are more conducive for “magical” auto-deployment, but I also wanted to illustrate that they aren’t absolutely necessary.
Upgrades are a natural part of life when dealing with software, and AX is no exception. If you’re still running AX 2009, the upgrades may have tapered off in favor of AX 2012 or even AX 7, but there are still patches released on a reasonable basis. If you have an automated code deployment system in place, however, these upgrades may be more complicated.
The way Microsoft distributes their updates is via an executable which deploys changes not only to the application files (normally the SYP layer), but in some cases to the actual server or application executable itself. Since our automated code deployment deals with the application files, the SYP changes will be propagated as normal, but we still need to manage the application executables. There is some added difficulty in that both the application executables and application files should be deployed around the same time to avoid either being out of sync.
We recently decided to upgrade our system from 2009 RU6 to RU8. The patch itself wasn’t to really fix issues we had, but to ensure we were compatible with some 3rd party software we were looking at. Prior to the deployment, we deployed RU8 to a test environment and performed functionality testing so we knew what we were getting into.
When it came time to deploy, we ensure that it would be the only thing that was applied to our Build system (we put a hold on development for a couple weeks). Since the patch would still have to go through our normal gauntlet of environments before reaching production, this allowed us to roll back in case we found a stopping issue.
Prior to the automated deployment to each environment, we applied the RU8 patch to the environment. The automation then would overwrite the changed layer files with those from Build (which should be the same), and everything would be in sync post-deployment. Because we wanted the timing to be reasonably close, our team had to work closely to ensure everything was on track. To ensure nobody used the environment before the deployment had a chance to run, we unchecked the option to restart the application server when the upgrade was complete. The automated process would then turn it back on as part of its normal operation.
Finally, when it came time to upgrading the production cluster, we came in after-hours before the normal scheduled update and did the same as we did to the pre-production environments: leaving them offline after the patch, and letting the automated deployment turn them back on. We did have to schedule downtime because of the extended time needed to apply the patch, but our users were well-informed and we didn’t have any issues.
In short, the automated build process can still help deploy any patches you need to apply to AX, but care must be taken to ensure the application executables are upgraded at the same time as the application files, or else you risk errors in the environment.
Normally, I try to only post things here that are relatively unique and not widely published across the internet. However, this is a topic that I’ve had confusion with in the past and feel the need to address. AX startup commands are generally easily found elsewhere, and if you can’t find them, it’s not terribly difficult to find and understand the code within AX. But, there are some parts of it I have found confusing until a short time ago, and want to try to clarify in case anyone else has the same confusions. I’ll also approach this from a perspective of adding a new command to the startup command list, ExportAOT.
How Startup Commands Are Used
The AX Client program, ax32.exe, allows for many flags, which change how the application is run. If any flags are not used, the program looks up the necessary values in the configuration file that was used to start the process or the values in the registry configuration (which is exposed via the AX Configuration Utility, axclicfg.exe). Startup commands in particular are defined by passing in a argument to the -startupcmd= flag on the command line, by defining a value to the startupcmd property in a configuration file, or by filling out a value in the “Command to run at application startup” field of the AX Configuration Utility (under the General tab).
Regardless of how the argument is passed into the client application, the format of the argument is "command_parameter". It should be noted that only up to one parameter can be passed into the application by default (you can expand this if needed), and it is optional, depending on the command supplied.
To clarify, a command should look like this (if executed from the command line):
The entire command (that is, "command_parameter") is passed into the \Classes\SysStartupCmd class, specifically the construct static method. From there, the command is parsed to obtain the command and parameter, and a subclass extending the SysStartupCmd class is created and returned to the application. The subclass will ultimately define the behavior of the application as it starts up.
There are 4 primary methods that are called as the application is started up, and are called in the following order:
1
applInit - Before the application is started
applRun - After the application has started running
infoInit - Before the infolog global controller is started
infoRun - After the infolog global controller is running
There is also a canRunmethod, which defines if the command should be allowed to execute. By default, commands can only be run if the user full access to the SysDevelopment security key or if the application is in setup/upgrade mode. This can be overridden in subclasses.
Adding a Command
So, to add a command to the framework, we need two things: a subclass that extends SysStartupCmd which will be used to actually run the task, and an entry in the SysStartupCmd::construct method.
The second is easy - just insert a case branch in the main switch, which sets sysStartupCmd to a new instance of our subclass (passing in the parameters s and parm, like the others):
All that’s left is to define the class so it does what we want. Because we don’t want it to run until after everything is loaded, we’ll only need to override the infoRun method in our class:
We have our actual functionality extracted to another class (ExportAOT), so we’ll just create a new instance and run it from our startup command. Because we want to have a default parameter in case one is not passed in, we also handle that as a simple ternary operation. Additionally, once we are done exporting, we want the client to automatically close, so we’ll use the shutDown method provided in SysStartupCmd class to close the application. If we wanted to adjust the conditions that need to be met for the user to be able to run the command, we would also override the canRun method to check for the correct conditions. However, for our purposes the default requirements will work.
List of Startup Commands
The following is a list of the startup commands that are present in the default AX 2009 system:
SetBuildNo - Updates the version information text in the About Microsoft Dynamics AX dialog
UpdateBuildNo
Synchronize - Synchronizes the data dictionary
CompileAll - Optional parameter “+”; + also updates cross-references
Exit - Shuts down the application
AotImport - Imports an XPO file into the AOT
ApplUpgrade
LoadLicense - Loads a license file into AX and shuts down
CheckBestPractices - Compiles the application and exports the Best Practice warnings to a file. If an XPO file is provided, only check the Best Practice warnings in the XPO.
AutoRun - Runs AX AutoRun tasks based on an XML file.
RunTestProject - Creates, runs and closes a test project
Batch - Starts the application to run Client batch tasks in a specific group
ViewAlert - Opens a specific alert
DrillDown - Opens the record that triggered an alert
ViewAlertRule - Opens the rule that triggered an alert
ImportResouces - Imports a resource into the AOT
XmlReflection - Creates an XML file based on reflection of the AOT
XmlDocumentation - Creates an XML documentation file
As many of you probably know, AX 2009 uses a concurrent licensing model. Compared to 2012’s access-based named-user model, 2009 only has a single pool of licenses, which are given to users on a first-come, first-serve basis. From my experience, the server will generally let you connect a few extra clients before users start receiving an error and the server denies the connection. If your company has more concurrent users than licenses available, there are only a few ways to help manage this situation:
Purchase additional licenses.
Set default timeouts on every user. When a client is inactive for the time specified by the timeout, the client is disconnected from the server (with a message to the user) and the client closed.
Keep an admin user (or similar) logged in. When the license pool starts getting depleted, manually kick users offline. We have done this in the past, and we normally tried to target only multiple or old sessions that were not properly terminated. You can achieve the same result by restarting server processes sequentially, allowing users to reconnect to a different server when one is taken offline. Once all the servers are restarted, users that are not active or improperly disconnected will naturally no longer be consuming licenses.
The last option is obviously less desirable, but we have been in a position where it was the only route available to us. Like many organizations, there is a fairly detailed process to request capital expenditures. In this context, one of our biggest struggles was justifying the need for additional licenses. The same users were not always complaining about not being able to use the system, but as administrators we were hearing about it at least once a day, if not 2-3 times. However, we were not able to quantitatively provide evidence that we were running out of licenses, or how many we actually needed.
While we no longer have to deal with our license pool on a daily basis, we still keep the consequences of releasing new functionality or otherwise expanding the user base in the back of our mind, and we are careful to make sure that such expansion won’t adversely affect our current users. To help with these kinds of decisions, I created a utility that examined our historical license usage over time.
The tool is based on İsmail Özcan’s post here, with modifications to make it more versatile.
while select infoT { info(strfmt("%1: %2", infoT.DateTime, infoT.UserCount)); } }
There is also an associated temporary table go with this class, which has two fields: a UtcDateTime (DateTime) and Int (UserCount). An instance of this table is populated during the execution.
The primary function, getStats, is very similar to the original code. Instead of hard-coding dates and working backwards from the current day, I use a dialog to collect the start and end days and work forward from the beginning in a single loop. Additionally, I allow the 1-hour check time to be any amount of time, measured in seconds (up to 24 hours). I also use the current user’s default Timezone Offset to determine the start and end times of the days, though I have noticed that Daylight Savings Time does tend to give one or two extra results if it lands in the middle of the requested range. I also fixed a bug that allowed users to be excluded from the count if they logged on or off at exactly one of the intervals.
I also added some additional framework to allow other objects to use the same processing, but there is no error checking or validation on inputs. Because the InfoLog can get rather extensive and difficult to handle, we’ve opted to consume this in a simple form that prompts the user for the start and end dates and resolution, and populates a grid with the result. From there, the user can export to Excel for further analysis or graphing.
The end results of this tool should be read as “At exactly time X, there were Y users logged in”, and won’t include any information about users who logged in and out between consecutive intervals. Generally speaking, a smaller resolution (eg, 1 second) will give you the greatest clarity, but since there are (60 60 24 =) 86400 seconds in a day, it will take a rather long time to process.
As our implementation of AX begins to mature and we move into a “wish list” phase, there is more of a demand to integrate other software systems to be accessed via AX. Along the way we’ve worked with various public APIs that request and respond using different languages. For reading responses, XML tends to be the easiest since there are native classes you can use to load XML and all you need are the respective XPaths to the nodes you want. If you have access to a WCF WSDL file, AIF is your friend (admittedly none of the APIs we have hit fall into this category so I can’t speak to them much). However, one common format that is a bit more of a challenge is JavaScript Object Notation - JSON. AX 2009 does not offer any kind of native support in parsing JSON and AX 2012 only offers it via the Retail module.
If you work with .NET, you are probably familiar with JSON.NET - the free open source library that helps serialize and deserialize JSON objects and XML into .NET objects with minimal effort. Since there is no native functionality in AX, we opted to use this library to do all the heavy lifting of deserialization. However, since JSON.NET was designed for use with C# and takes heavy advantage of concepts not available in X++ such as generics, we will have to do some wrapping to get everything to work correctly. Additionally, since AX does not easily support “objects” in the traditional C#/.NET sense, we also need a way to traverse the JSON object - not unlike how we would deal with XML - instead of mapping the JSON to a local class.
With that in mind, here’s what we’ve come up with as a base model/wrapper class:
The first couple methods are fairly standard and easy to understand. A load function parses the JSON string and saves it into the class for use elsewhere, and a static method is available to make it easier to create a new class. The traversePath method is actually the most important part of the entire class. You can pass in an object notation path to the node you want to get to - for example, “Message.More.Text” - and the function will return the value of that node. If the node is not found, null is returned.
In short the process operates:
Separate the path based on common object notation delimiters (“.” “/“ and “\”) into a list of elements (eg, "Message.More.Text" is separated to <"Message", "More", "Text">)
Attempt to find a property in the JSON object given (by default, this is the object loaded into the class) with a name equal to the first path element
If the object being checked is an array type, use the one-based index of the array
If no property is found, return null
Get the type of the value attached to that property
If it is not an object or array, return the value
If the value is another object or array:
Trim the first path element from the original path, leaving the remaining node(s) (eg. "Message.More.Text" is adjusted to "More.Text")
Create a new JSON object based on the value of the property (eg. {"Object":{"Property_1":15, "Property_2":"Stuff"}} becomes {"Property_1":15, "Property_2":"Stuff"})
Pass the new path and new object recursively back into the function and return the result
By taking advantage of recursion, we can dig as deep into the object as we need until the requested node isn’t found or there is a value to return.
Finally, because the CLR object hasn’t been marshaled to the X++ data type yet (which generally only happens on assignment), we need to convert the result to the specific value type using some additional methods:
You’ll notice the string function is a little different because marshaling from System.String to str doesn’t actually work because it is a class, not the base data type. We run it through the System.Convert method first to ensure we are getting the base data type. For any other data type you can directly use the result of the traversePath method. Keep in mind you can’t use the result directly in a strfmt statement (you will get a ClrObject static method invocation error), so you will need to first assign them to local variables.
If you need to loop through an array of object results, you can do something like this:
1 2 3 4 5 6 7 8 9 10 11 12 13 14 15 16 17
JsonReader reader; str json, strResult; int i, intResult; ;
You will need to make sure you check for a property that is always present in the object - if you have a JSON result that has dynamic objects that hide empty/null values this won’t work correctly. You also can’t directly check that an array index exists if all it contains are objects (eg. checking for "object.1" in the object "{"object":[{"Property":"Alpha","Value":1},{"Property":"Beta","Value":2}]}" will return false, even though it is a valid index). If the array is just values however, it will work correctly (eg. checking for "object.1" in the object "{\"object\":[\"Alpha\",\"Beta\",\"Gamma\"]}" will property return true).
As with most projects, I’m sure this will continue to evolve, and this is by no means a perfect solution. However, it does handle most of the common situations you’ll run into with JSON, and provides a reasonable framework to build from.
Questions, comments, missed situations? Shoot me a comment below!
Some time ago, we created two posting-style reports for our implementation of AX. These reports follow the same process as other posting processes (like invoices, packing slips, etc), so while not the easiest report to create due to all the new classes required by the FormLetter framework, we were able to get them in place and workable. To help expedite the development process, instead of creating the new classes from scratch we duplicated the class that was similar to it, changed a few of the parameters and wired it up to the new report layout. For example, we duplicated the SalesFormLetter_Invoice class to SalesFormLetter_OtherInvoice, SalesFormLetterReport_Invoice to SalesFormLetterReport_OtherInvoice, etc.
One thing we have been fighting since the development of these reports is the print settings. From a users perspective, the settings can be changed, but are never used. In fact, no matter what you set on these new reports, it will always use the print settings on the report that was copied; in the above example, when you would go to run the Sales Order Other Invoice, it would use the Sales Order Invoice’s print settings. This caused some especially odd errors when users moved desk locations and had a different printer to print to, more so if the user did not have access to the original report. In this situation, the only way we could figure to address the issue was, after such a move, security would be opened for that user to be able to run the original report, make the necessary changes to the print settings and revoke access. This was cumbersome, but thankfully did not occur terribly often.
More recently, one of our users that has to deal with this issue was bouncing between two different desk locations on a regular basis, and each of the locations had a different printer to print to. Since the printers were local (not networked), the printer the report tried to print to was considered ‘not installed’, and they were unable to print at all. The default was to send the report directly to the printer, and as we were unable to change the settings on the parent report, it caused a fair amount of legwork to get everything working until the user could settle down to a single desk location.
Finally being able to take the time to comb through these reports, I found that this issue was cause because after duplicating the classes, not all the settings were taken into account - particularly the settings revolving around Print Management. Previously, this had been overlooked because we don’t actively use the Print Management framework.
Following the Microsoft White Paper AX 2009 Print Management Integration Guide, I created new document types for these reports, associated them in the same node locations as the original reports, and updated the trouble reports to use the new document types. Once the default module-level Print Management settings were created for the new document types, the reports began to print to the location requested in the posting dialog without impacting the original report settings.
If anyone seems to have the same issue, be sure to look closely at the printMgmtDocumentType method of the FormLetter class for the report (eg SalesFormLetter_Invoice, PurchFormLetter_PackingSlip), and make sure it references a unique document in the Print Management framework. It’s easy to overlook, especially if you do not use the framework for printing.
One of the more well-known drawbacks of AX 2009 is the lack of user security reporting. For privately held companies, this can be an issue, but one some may be comfortable overlooking. For a publicly traded company, this problem is expounded, as auditors will often demand some kind of documentation that users cannot get access to cross-functional responsibilities that would violate Segregation of Duties policies. Without third-party tools, this reporting normally means that the auditor in question would run the User Permissions report for the users, and compare that with a document that organizes what access a user must have to do a particular task. Normally this is a long, tedious and expensive process, which is done at least once a year.
To help combat this process, we created a reasonably simple report which does this automatically. By making the system check for permissions, we have reduced errors in these types of checks significantly and can get this information very quickly and reliably.
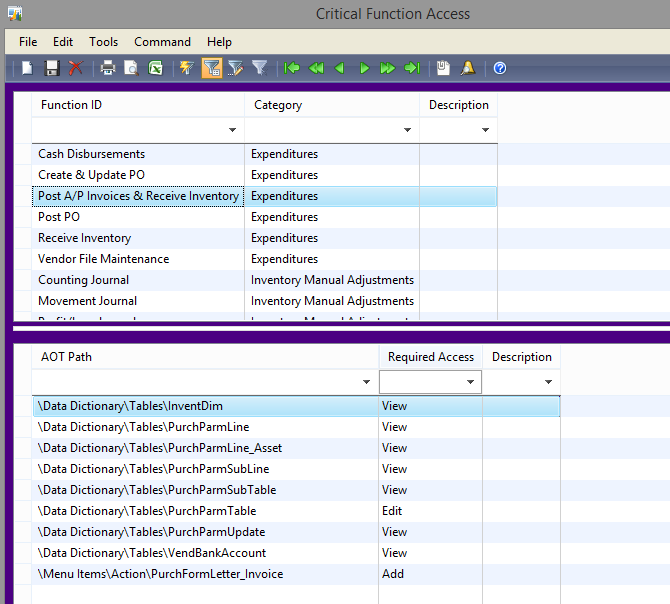
At the core of the report, there are two populated tables: one of the tables holds a list of all the functions we want to test for, while the other table holds what elements should be checked for each function. Since most functions actually need multiple permissions together to be able to work correctly, there is a 1:n relationship between these tables. For example:
The Category column is simply a way our auditors prefer the functions to be grouped. Additionally, each security element needs to be identified by the actual AOT path. For the purposes of this report, all table access is governed by the table itself, not by the permissions on individual fields.
Additionally a user must have the specified access (or higher) for each element for the user to be considered to have access to the particular function. If they are missing the correct level of access to just one of the nodes, they are not considered to have access to the function.
Once the information is populated, the primary class is executed.
if (!sks) throw error(strfmt("SecurityKeySet must be loaded before checking permissions"));
tn = TreeNode::findNode(_elementAotPath);
if (!tn) throw error(strfmt("AOT Path does not exist: %1", _elementAotPath));
switch (tn.applObjectType()) { case UtilElementType::OutputTool: case UtilElementType::DisplayTool: case UtilElementType::ActionTool: return sks.secureNodeAccess(tn.AOTname(), tn.applObjectType()); case UtilElementType::Table: return sks.tableAccess(tn.applObjectId()); case UtilElementType::TableField: return sks.fieldAccess(tn.AOTparent().AOTparent().applObjectId(), tn.applObjectId()); case UtilElementType::SecurityKey: return sks.access(tn.applObjectId()); default: throw error(strfmt("Could not determine security for %1 node %2", tn.applObjectType(), tn.AOTname())); } }
privateboolean permissionForFunction(SecurityAuditFunctionId _functionId) { AccessType userElementAccess; int funcDefLines; ;
while select funcDefs where funcDefs.FunctionId == _functionId { userElementAccess = this.permissionForElement(funcDefs.AotPath); funcDefLines++;
//Short-circuit lookups if user doesn't have necessary access if (userElementAccess < funcDefs.RequiredAccess) returnfalse; }
//only return true if there was at least one definition record for the function return (funcDefLines > 0); }
select count(RecId) from companyDomainList where companyDomainList.DomainId == "Prod"; select count(RecId) from userInfo where userInfo.Enable == NoYes::Yes; select count(RecId) from functions;
while select companyDomainList where companyDomainList.DomainId == "Prod" { progress.setText(companyDomainList.CompanyId, 1); progress.setCount(0, 2); this.setupExcel(companyDomainList.CompanyId);
while select userInfo where userInfo.Enable == NoYes::Yes { //processes to do on a per-user basis progress.setText(userInfo.Id, 2); progress.setCount(0, 3); this.loadSecurityKeySet(userInfo.Id, companyDomainList.CompanyId);
//Advance the Excel cell one row and back to beginning row++; column = 1; this.writeInExcel(userInfo.Id);
while select functions orderby FunctionCategory asc, FunctionId asc { //processes to do on a per-function basis progress.setText(functions.FunctionId, 3); progress.incCount(1, 1); progress.incCount(1, 2); progress.incCount(1, 3); userHasAccess = this.permissionForFunction(functions.FunctionId); this.writeInExcel(enum2str(userHasAccess)); } } }
application.visible(true); }
///Excel needs some header information added to it before the main work can be done privatevoid setupExcel(selectableDataArea _company) { str rangeStr; int sheetCount, counter; ;
//Delete all but the first worksheet for (counter = workbook.worksheets().count(); counter > 1; counter --) { workbook .worksheets() .itemFromNum(counter) .delete(); }
///Writes the provided text to the current cell coordinates in Excel ///Will automatically advance the cell to the next column privatevoid writeInExcel(str text) { cells.item(row, column).value(text); column++; }
The report itself is generated directly to Excel, because the system can be set up to have any number of functions, and test any number of users for those functions. In addition, it is run for every company, creating a new tab for each one. In our case, we have a domain that contains all of our active companies which drives what companies the report will run for (“Prod”, which is referenced a couple times in the code). Various methods are included to help easily manage the Excel side of things so we can focus on the more important part: determining access.
The heavy lifting is of course done by the Run method, which loops through each function and hands off to to the permissionForFunction method. This method, in turn, loops through the definition of the function and passes each AOT path to the permissionForElement function, which tells what level of access (if any) the user has to that particular AOT node. If at any time the permission for the AOT node falls below the required level for that node, we short-circuit a “No”, which keeps the system from having to check every node for every user.
Finally, once we know if the user has access or not, we print the answer to the appropriate Excel cell. When the spreadsheet has been completely populated, we make the application visible and end the task.
This relatively simple report makes it easy to add or remove what we term Critical Access areas, which are generally SoD compliance type functions, but it could be used for other things as well. Since everything is run on-demand, and against the user’s actual security, we can be sure that so long as the definitions are accurate, the report will also be accurate, and the results can be examined in minutes instead of days.
We have recently started a long-term project to standardize our purchased and manufactured part numbers - not a small task. We’re okay with doing a straight rename on the item card (which flows to all documentation historically), but renaming items has two side effects: the user who triggered the rename has their client session effectively locked until the rename is complete (which can take up to half an hour), and other users who use items on a regular basis, such as those doing production scheduling and entries, notice the system running considerably slower during the rename. In a few cases, we have even run into deadlock issues.
To help combat this, we’ve constructed a periodic task for renaming items. Simply, a table holds a queue of what items should be renamed to what, and a batch task is scheduled to process the renaming after-hours. Recently, this was expanded so any BOMs related to the item would be renamed to coincide with the new item number as well (our BOMs are named after the item numbers, with versions of the BOM being named [Item Number].[Version]).
The process is fairly straight forward. We have a definition or queue table, MaintBatchRenaming. We begin by setting all non-complete records on that table to be marked as ‘In Progress’, and then loop through all records that are marked as such (this helps catch records that were previously marked but never finished). For each item, we check to see if the new item number already exists, and if it does we skip the process. Otherwise, we pull the InventTable record, set the ItemId to the new item number and run the renamePrimaryKey method. Contrary to 99% of the examples you find when researching the renamePrimaryKey method, you do not need to call CCPrimaryKey::renamePrimaryKey unless you have the Human Resources I or Questionnaire II configuration keys enabled (plus a few other requirements), which we do not.
During the process, we also look at all the BOMs associated with the item, and run it against a regex to determine what the BOM should be renamed to - for example, if the item ABC is renamed to XYZ, the BOM ABC.1 should be renamed to XYZ.1, ABC.2 should be renamed to XYZ.2, etc. If the BOM does not match the [Item Number].[Version] pattern, it is not renamed.
Once all the renaming is complete, the record in the queue is marked as complete and no longer in progress with current the date and time, and the process moves to the next item. If there is a problem renaming the item and/or BOMs, the record is skipped until the next processing.
One of the challenges associated with this is validation and historical record keeping. We want make sure the item number to be changed is an actual item number - this can be accomplished by associating the field with the EDT ItemId, which enforces the association. However, once the rename is complete, we have no record of what the original item number was because it was renamed everywhere that association is enforced.
To combat this, we created another field on our queue table, OrigItemId, which is a string of the same size as ItemId, and added an edit method on the table:
We then use the edit method on the form instead of directly adding the item number field. Because it has a return type of ItemId, it is also associated with the Item table and gets the validation on input, but the return value is not validated, allowing us to show a string that is no longer an item number in the form after the rename is complete.
The end result is a system that allows users to add renaming tasks to, which complete overnight in batch. Not only do the renames process faster on the server, but they also don’t have as many issues because fewer users are in the system.